
Course Builder Tool
Please Be Aware
The University of Arizona transitioned to Brightspace's New Content Experience on August 17, 2026. All Brightspace sites will use New Content Experience.
On This Page
Inserting Placeholders into Course Tree
Converting Placeholders into Content
Inserting Content into Course Tree
View, Add or Edit Content via Browse Tools
Moving Nodes in the Course Tree
What Is Course Builder?
At its core, Brightspace's Course Builder is an instructional design tool that helps you to lay out a course's structure in a single interface. With Course Builder, instructors & instructional designers can plan, design & build course content all in one tool.
Best yet, Course Builder makes moving content around really simple. Course Builder also makes quick work of copying structure so you can save time building out the perfect course. Course Builder is the tool to help you build your course site!
But, don't take our word for it. Watch the infomercial below to get a glimpse of what Course Builder can do for you! Don't forget to check out the recording of the July 2026 IDEA Course Builder sessionat the bottom of this page (requires University of Arizona NetID login to watch).
Course Builder Infomercial
Accessing Course Builder
Important
Users with a TA All Sections or TA Specific Sections aren't able to access Course Builder. In order for these users to access Course Builder, they require an Instructor role in the course site at the primary instructor's discretion.
Step 1
Select Course Admin in the NavBar.
Step 2
Under Site Resources, select Course Builder.
Note
If your course site includes content, Course Builder is populated with that content. If you haven't yet added any modules or content, Course Builder contains a single item (node) in the center of the screen denoting the course itself.
Course Builder Interface
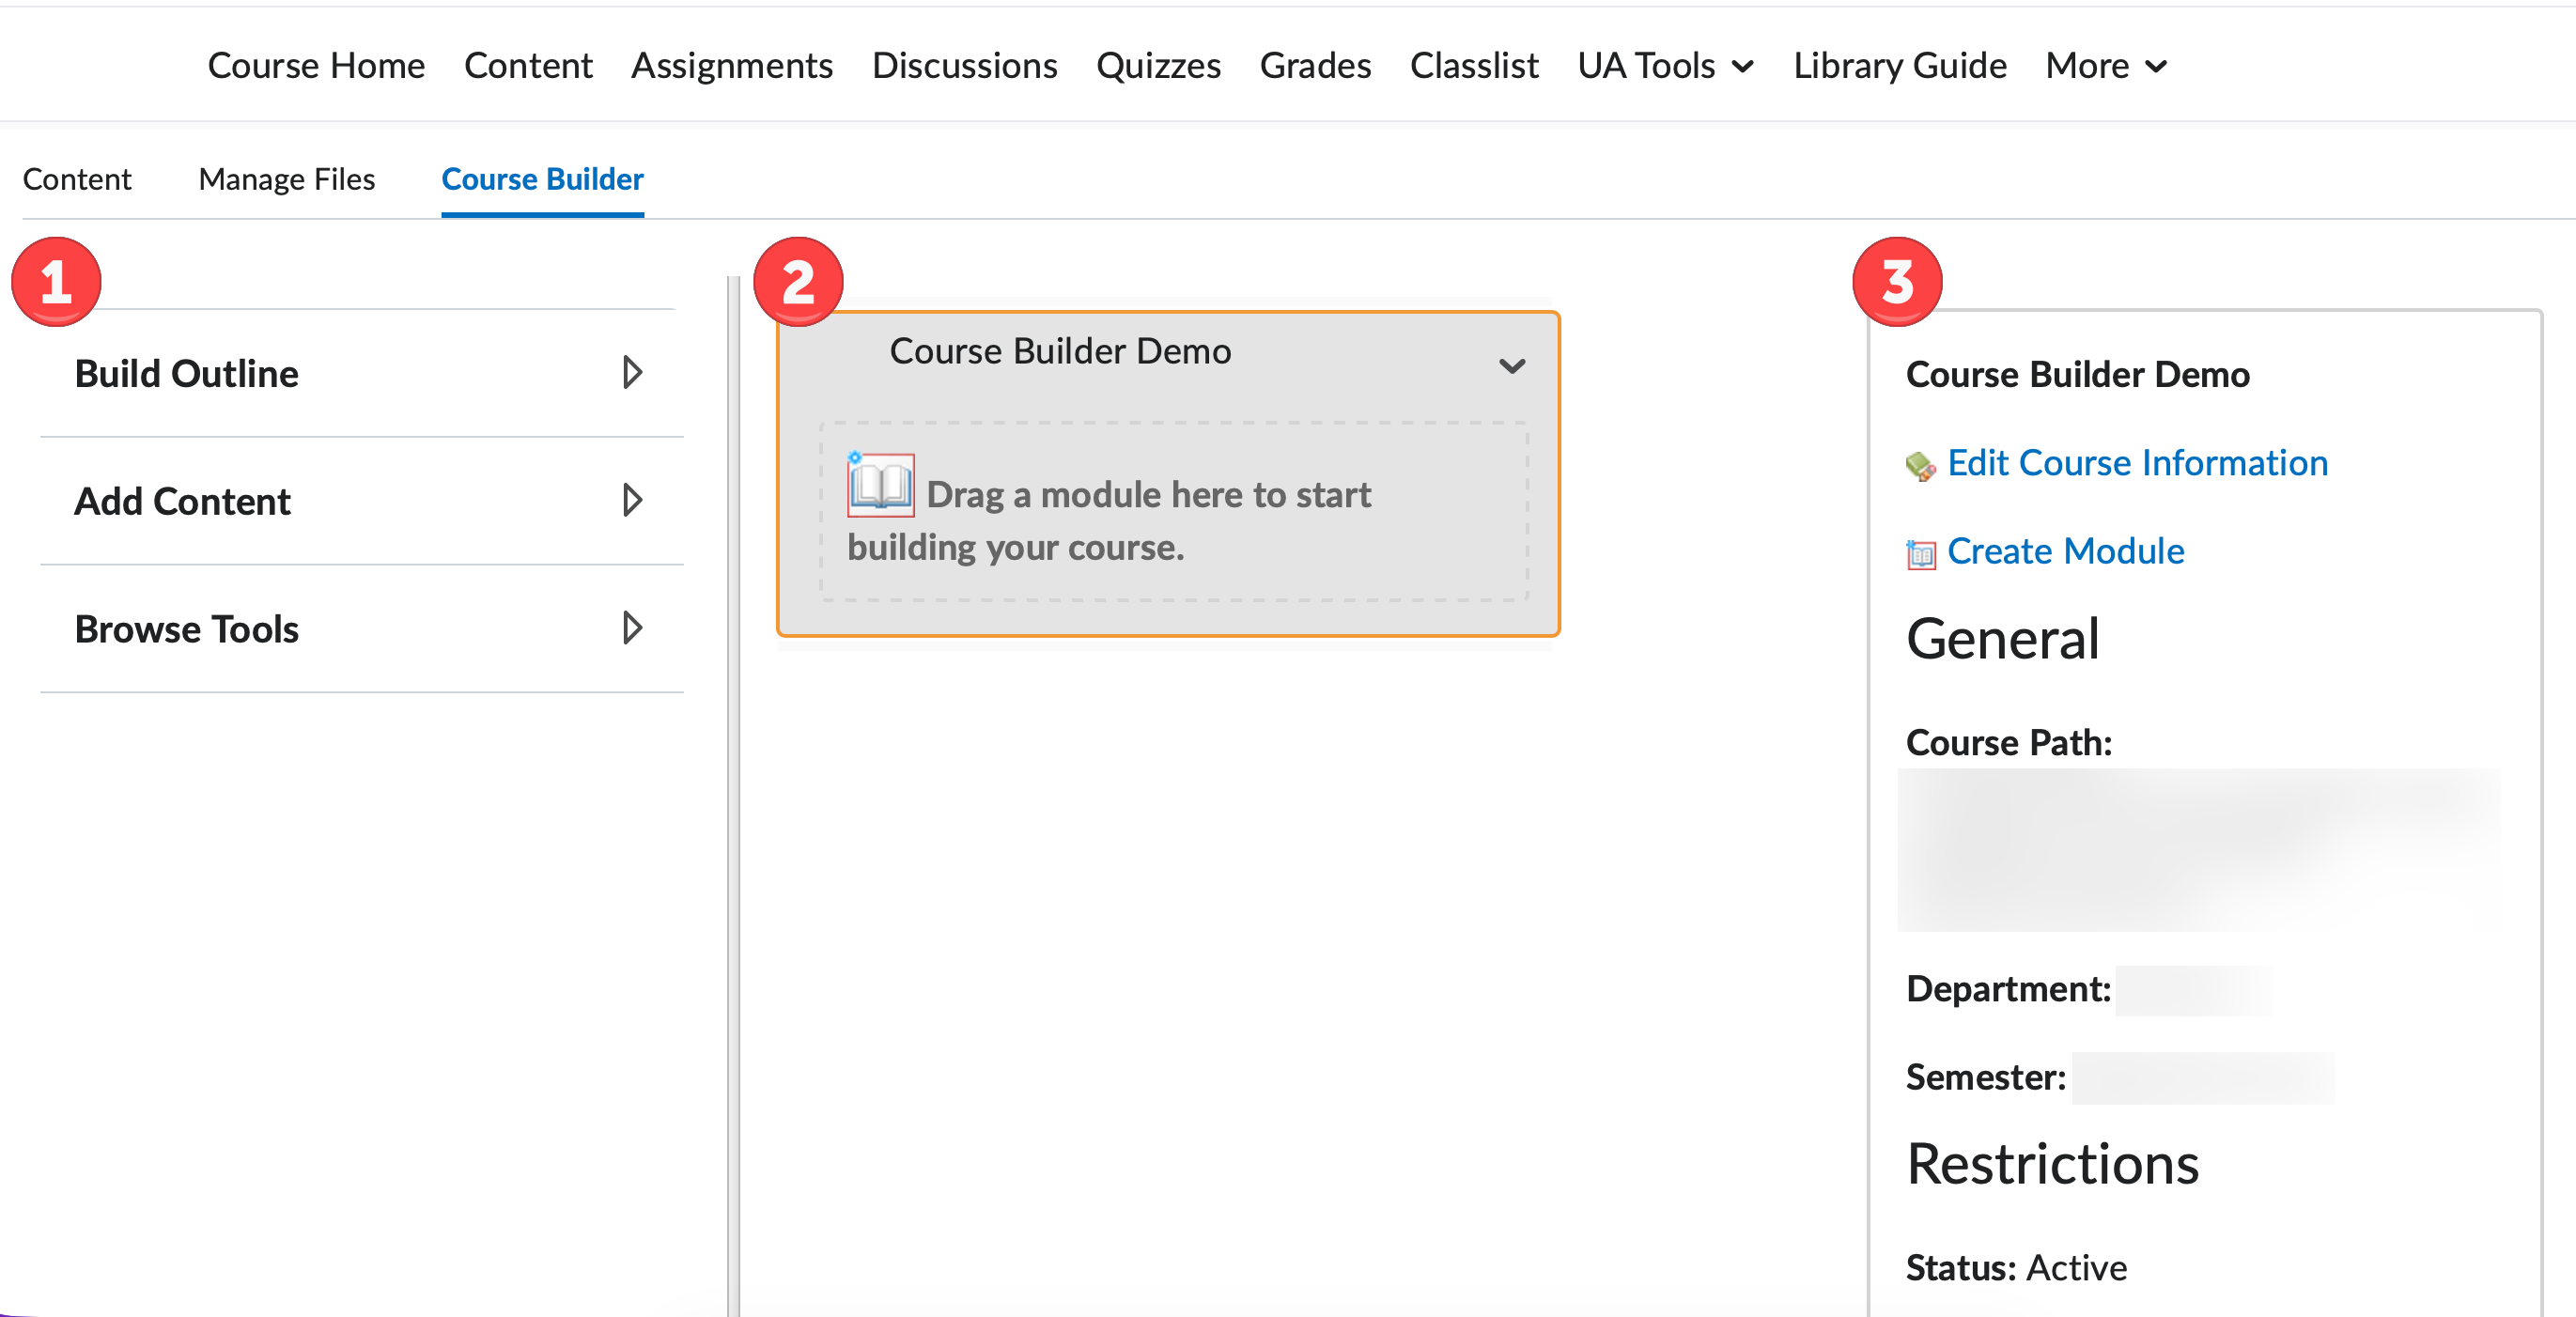
Course Builder is comprised of three main areas, detailed below:
Toolbox (1)
You find the Toolbox on the left side of the screen. It contains three components:
- Build Outline: allows you to insert modules and placeholders into the Course Tree in order to create structure for your course's content.
- Add Content: allows you insert content into the Course Tree.
- Browse Tools: allows you to use Brightspace tools to add items to your Course Tree. You can create new Assignments, Discussions and Quizzes as well as grade items from this option.
Course Tree (2)
The Course Tree area is found in the middle of the screen. It always includes a top-level node called the Course Node. The structure of your course content appears here.
Selected Node Panel (3)
On the right side of the screen you'll find the Selected Node Panel. This area displays useful information in a single panel, including links to the item itself or actions you can take next.
Note
Use the expand/collapse icons to the right of each tool's name to expand or collapse the submenu. This can help the interface appear more user-friendly.
Adding Modules to Course Tree
Step 1
From Build Outline, select the Create a Module icon, which looks like an open book.
Step 2
Select a location in the next menu.
Step 3
Insert a name for the module.
Step 4 (optional)
If desired, enter any notes in the HTML box.
Note
Notes are not visible to students. They do not appear in the Content section of your course site. These notes are for your internal use & course planning.
Step 5 (optional)
If desired, select the checkboxes and use the calendar tool to set any start and/or end dates & whether to display those dates in the course calendar.
Step 6
When finished, select Create.
Inserting Placeholders into Course Tree
Note
Placeholders aren't visible in your course's content. They function solely as a way to indicate in Course Builder where you plan to place something at a future point. Placeholders can be discerned by their dashed outline & pale-blue background
Step 1
From the Toolbox, select Build Outline.
Step 2A (Option 1)
Select the icon of the desired item from the available options:
- Link placeholder
- File placeholder
- Discussion placeholder
- Quiz Placeholder
Step 2B
Select the desired location to insert the placeholder by selecting on the applicable node in the menu. Use the Plus icon to expand a node that already has nested items.
Step 3 (Option 2)
Drag the icon of the desired option to the corresponding node where you want to place it in the Course Tree & drop it on the node.
Step 4
Give a name to the placeholder.
Step 5 (optional)
If desired, enter any notes in the HTML box.
Note
Notes are not visible to students. They do not appear in the Content section of your course site. These notes are for your internal use & course planning.
Step 7
When finished, select Create.
Converting Placeholders into Content
Step 1
Select the desired placeholder node in the Course Tree.
Step 2
Choose New; depending on the type of item associated with the placeholder, the phrasing will be along the lines of New Assignment, New Link, New Quiz, New Discussion.
Step 3
Complete the required setup menu for the item type in question.
Inserting Content into Course Tree
Step 1
From the Toolbox, select Add Content.
Step 2A (Option 1)
Select the icon of the desired item from the available options:
- Create a Link
- Create a Page
- Create a Discussion
- Create an Assignment
- Create a Quiz
- Create & Associate a New Grade Item
Step 2B
Select the desired location to insert the placeholder by selecting on the applicable node in the menu. Use the Plus icon to expand a node that already has nested items.
Step 3 (Option 2)
Drag the icon of the desired option to the corresponding node where you want to place it in the Course Tree & drop it on the node.
Step 4
Depending on the item chosen, complete the required details:
- Link: select the desired item to place a QuickLink to. For more information, see QuickLinks (opens in a new tab).
- Page: insert a name for the page, as well as a name for the corresponding course file (can be the same name); use the HTML editor to create the page's content; apply any date restrictions.
- Discussion: select or create the desired Forum; insert a name; use the HTML editor to insert a description; select or create a grade item; if applicable, insert score value; use the checkboxes to select desired options; apply any date restrictions.
- Assignment: insert a name; use the HTML editor to input instructions; select submission type; attach any desired file(s); insert score value; select or create a grade item; apply any date restrictions.
- Quiz: insert a name; toggle the description on, if desired, & use the HTML editor to input the description; select or create a grade item; choose options to synchronize and/or publish results; uncheck the box if the quiz is to be made visible at creation; apply any date restrictions.
- New Grade Item: insert a name; select or create a category, if desired; use the HTML editor to input a description, if desired; set the points value; if applicable, select options for exceed, bonus or exclusion from Final Calculated Grade; apply any date restrictions.
Note
New Grade Items can only be created & attached to items that already exist as a node in the Course Tree. Only numeric grade items can be created via Course Builder; use Grades if you desire a different grade item type.
Note
When inserting a new page in Course Builder, Brightspace transfers the title into the HTML file name, carrying down full stop/periods into the HTML file name. This leads to an error in Content when accessing that page. Ensure the full stop/period is removed from the HTML file name before adding the page in Course Builder.
Step 6
When finished, select Create.
View, Add or Edit Content via Browse Tools
Step 1
From the Toolbox , select Browse Tools.
Step 2
Select the desired option from the available menu:
- Course Files
- Discussions
- Assignments
- Quizzes
- Grade Items
Note
Learning Objectives appears as an option in this list. However, at present, these are not available at the University of Arizona.
Step 3
Depending on the item chosen, complete the applicable steps:
- Course Files: use the checkbox to select the desired item (or) use the Upload File icon to create a new file; select Add to Course on the next screen & choose the location to place the file.
- Discussions: select the desired discussion via the checkbox (or) use the New Discussion icon to create a new discussion; on the next screen, if edits are desired, select the item and on the next screen, choose Edit Discussion; select Add to Course & choose the location to place the discussion.
- Assignments: select the desired assignment via the checkbox (or) use the New Assignment icon to create a new assignment; on the next screen, if edits are desired, select the item and on the next screen, choose Edit Assignment; select Add to Course & choose the location to place the assignment.
- Quizzes: select the desired quiz via the checkbox (or) use the New Quiz icon to create a new assignment; if edits are desired, select the item and on the next screen, choose Edit Quiz; select Add to Course & choose the location to place the quiz.
- Grade Items: use the radio button to select the desired grade item (or) use the New Grade Item icon to create a new grade item; on the next screen, if desired, select Edit Grade Item to make any edits; select Add to Course & choose the item to attach the grade item to.
Note
When using Browse Tools, you can return to the main menu by selecting the left arrow next to Browse Tools at the top.
Moving Nodes in the Course Tree
Step 1
From the Course Tree, locate the desired node.
Step 2 (Option 1)
Select the Action Menu button and choose Move Up, Move Down or Move To.
Step 3 (Option 2)
Select on the desired node & drag it to the desired location; use the blue line above or below to indicate where you wish to place it (or) hover over a module until it turns orange; drop the item to place it.
Copying & Pasting Structure
Note
Copy Structure allows you to set up structure in a module as a template, copy it & paste as a new module or within an existing module node. Use this feature to rapidly build out a course structure which repeats across multiple modules.
Step 1
From the Course Tree, locate the desired module & select the Action Menu button.
Step 2
Select Copy Structure.
Step 3A (Option 1)
To paste the structure as a whole new module, select the Action Menu button on the course node at the top of the tree; select Paste.
Step 3B (Option 2)
To past the structure within a module node, select the Action Menu button on the desired node; Select Paste; choose Paste After, Paste Before, or Paste as Child (i.e. nested).
Note
Use Paste as Child to place a node as a submodule.
Deleting Nodes from the Course Tree
Important
Once deleted, the node is permanently removed from the course site and is not recoverable.
Step 1
From the Course Tree, locate the desired node and select the Action Menu button.
Step 2
Select Remove.
Step 3
Confirm deletion on the next screen by selecting Remove.
Note
It is possible to delete en masse in Course Builder by moving all desired nodes into a single module & then deleting the top-level node. This step should only be undertaken when you are sure you want to permentantly & irretrievably delete the item(s).
Use the Selected Node Panel
Note
The Selected Node Panel appears on the right side of Course Builder. The available options change based on the node selected.
Step 1
From the Course Tree, locate the desired node.
Step 2A (Course Node)
Select Edit Course Information to make changes to the course site name, course image, hide/show the course banner, course color scheme; select Save when done.
Step 2B (Module Node)
Select Edit Module to make changes to the module; select Upload Files to upload a new course file to include in the module; select Save when done. You can also toggle between Published or Draft status.
Note
Modules in draft status do not appear in Content & students will not be able to access them.
Step 2C (Assignment, Discussion or Quiz Node)
To open the item in Content, select the item name at the top of the panel; select Edit Notes to make changes to the notes; select Edit Assignment/Discussion/Quiz to make edits to the activity; select Save when done. You can also toggle between Published or Draft status.
Step 2D (Placeholder)
Select Edit Placeholder to make changes to the placeholder, selecting Save when finished; select New Assignment/Discussion/Quiz to replace the placeholder with an activity, selecting Create when finished.