
Create or Import Questions
On This Page:
Create Multiple Choice Questions
Create Fill-in-the-blank(s) Questions
Create Multi-Short Answer Questions
Import Questions
Step 1
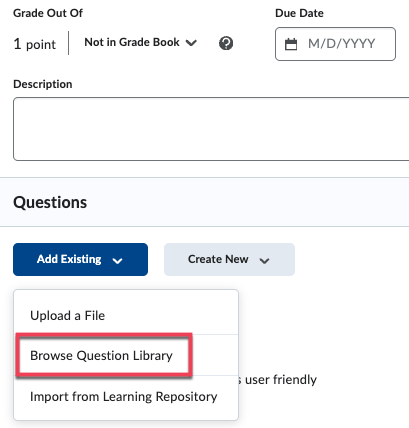
While editing a quiz, select Add Existing and Browse Question Library.
Step 2
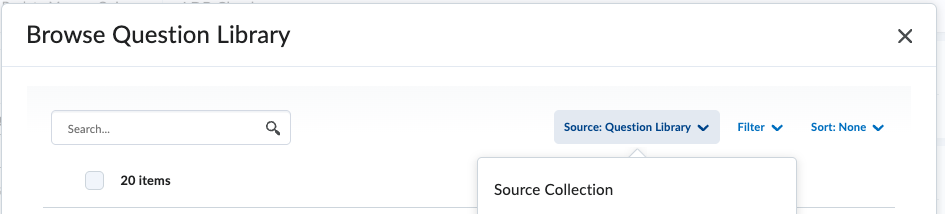
Open the Source Question Library to locate the options available.
Step 3
Open the desired source and select the checkbox next to the question(s) you wish to import.
Note
If you want to see the full question text, select the magnifying glass icon to the right of the question. Use the filter and sort options (top right) to narrow your list of questions.
Step 4
Select the Import button. If you want to specify where questions will be located in the quiz, select the down-arrow icon next to the Import button to open the Import to menu and choose one:
- Import to top of the Quiz
- Import to Bottom of the Quiz
- Import to Section (and select the section)
Note
If you want to change the points value or make any of your questions bonus (optional questions for students extra points) or mandatory (students are forced to answer), select the checkbox next to your questions and select the More Actions button that appears.

Step 5
Select the Save button to continue editing the quiz (or Save and Close to save your changes and exit the quiz).
Create True/False Questions
Step 1
Select Quizzes from the course navbar.
Step 2
Select the Question Library tab.
Note
You can also use the Create New button within an individual quiz, but our recommended workflow is to create questions in the Question Library so you can use them for multiple courses.
Step 3
Select the name of any Section folder to open it.
Step 4
Select the New button.
Step 5
Select True or False Question (T/F) from the menu.
Note
We recommend leaving the Title field blank. The Question Text will become the title by default, allowing you to see the question without selecting it to open it.
Step 6
Type or paste your question into the Question Text box.
Note
When pasting text, Brightspace will inherit any formatting (e.g., font type and size, indentations, etc.) embedded in the source document. To remove all formatting when pasting your text into Brightspace, use the following keyboard shortcuts: PC users press CTRL+Shift+V; Mac users press Command+Shift+V.
Step 7
Use the round radio buttons to indicate if the correct answer is true or false.
Step 8
Enter the number of points this question will be worth in the Default Points field.
Step 9
Preview the question to ensure it looks how you want; note that Brightspace automatically shows you how the question will appear on the quiz.

Step 10
Select the Save button to save your question.
Note
Select the More Actions icon next to the Save button for more options. Save and New will save your current question and open a new True/False question. Cancel will return you to the Question Library without saving your changes.
Create Multiple Choice Questions
Step 1
Select Quizzes from the course navbar.
Step 2
Select the Question Library tab.
Note
You can also use the Create New button within an individual quiz, but our recommended workflow is to create questions in the Question Library so you can use them for multiple courses.
Step 3
Select the name of any Section folder to open it.
Step 4
Select the New button.
Step 5
Select Multiple Choice Question (MC) from the menu.
Note
We recommend leaving the Title field blank. The Question Text will become the title by default, allowing you to see the question without selecting it to open it.
Step 6
Type or paste your question into the Question Text box.

Note
When pasting text, Brightspace will inherit any formatting (e.g., font type and size, indentations, etc.) embedded in the source document. We recommend that you remove all formatting and use the following keyboard shortcuts to paste your text: for PC, press CTRL+Shift+V; for MAC, press Command+Shift+V.
Step 7
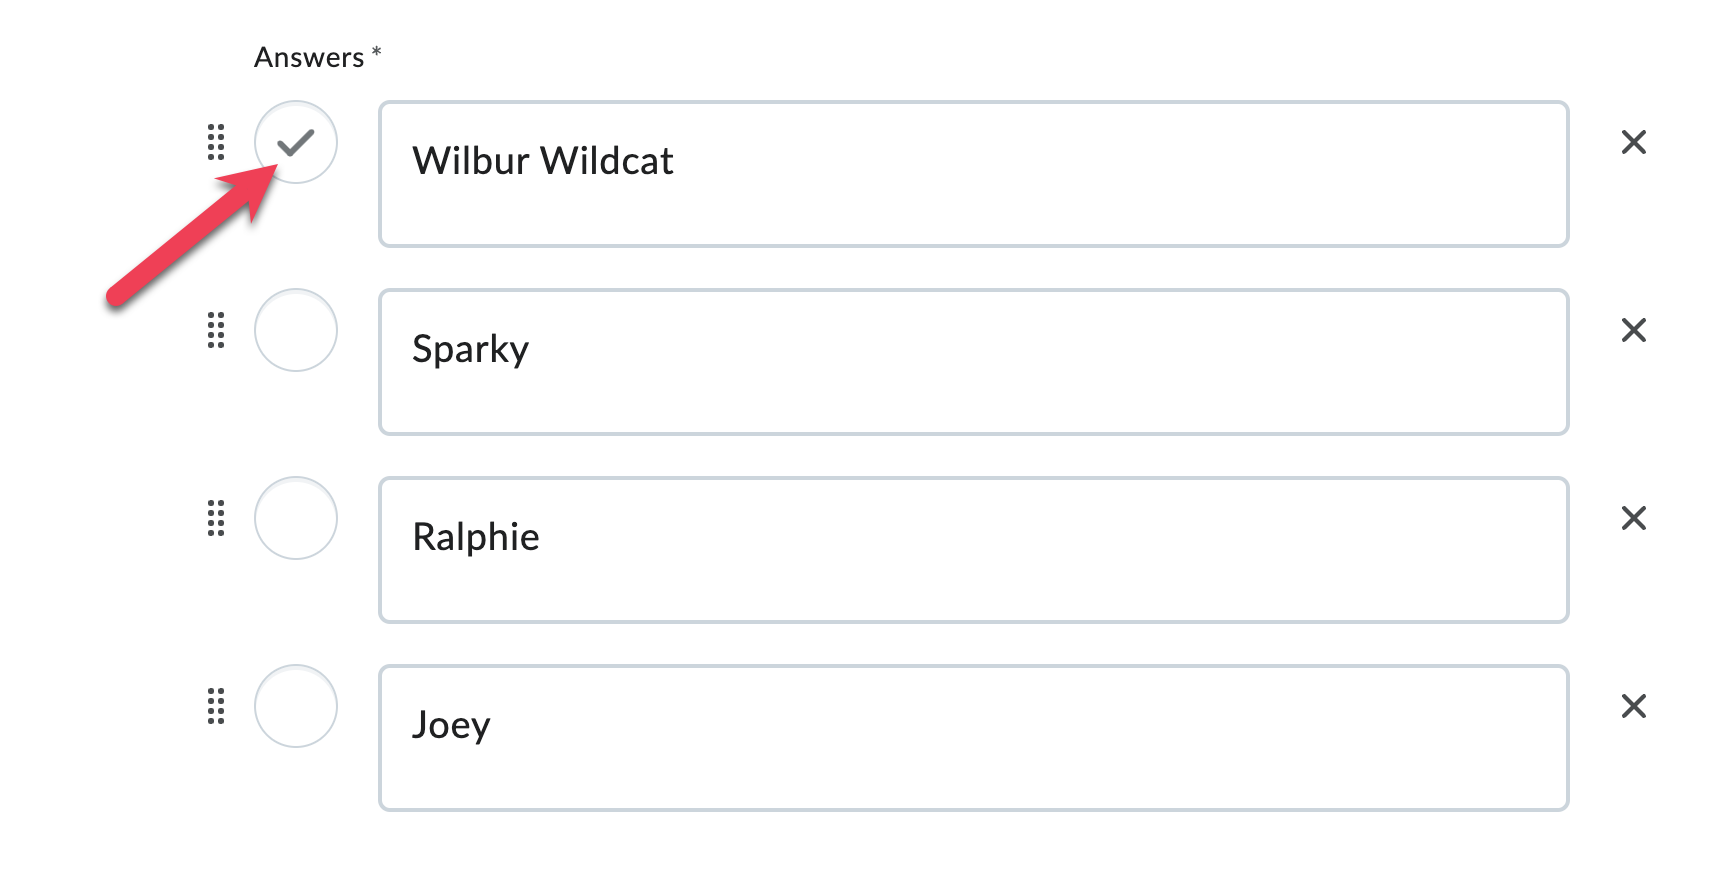
Type or paste the answer choices into the Answers fields. Use the round radio buttons to indicate which answer is correct.
Step 8
Select Add Answer if you want to add another answer choice.
Step 9
Select the X icon to delete any empty answer fields.
Step 10
If you want Brightspace to automatically randomize the order in which those answers appear on the quiz, check the Randomize Answers box.
Step 11
Enter the number of points the question is worth in the Default Points field.
Step 12
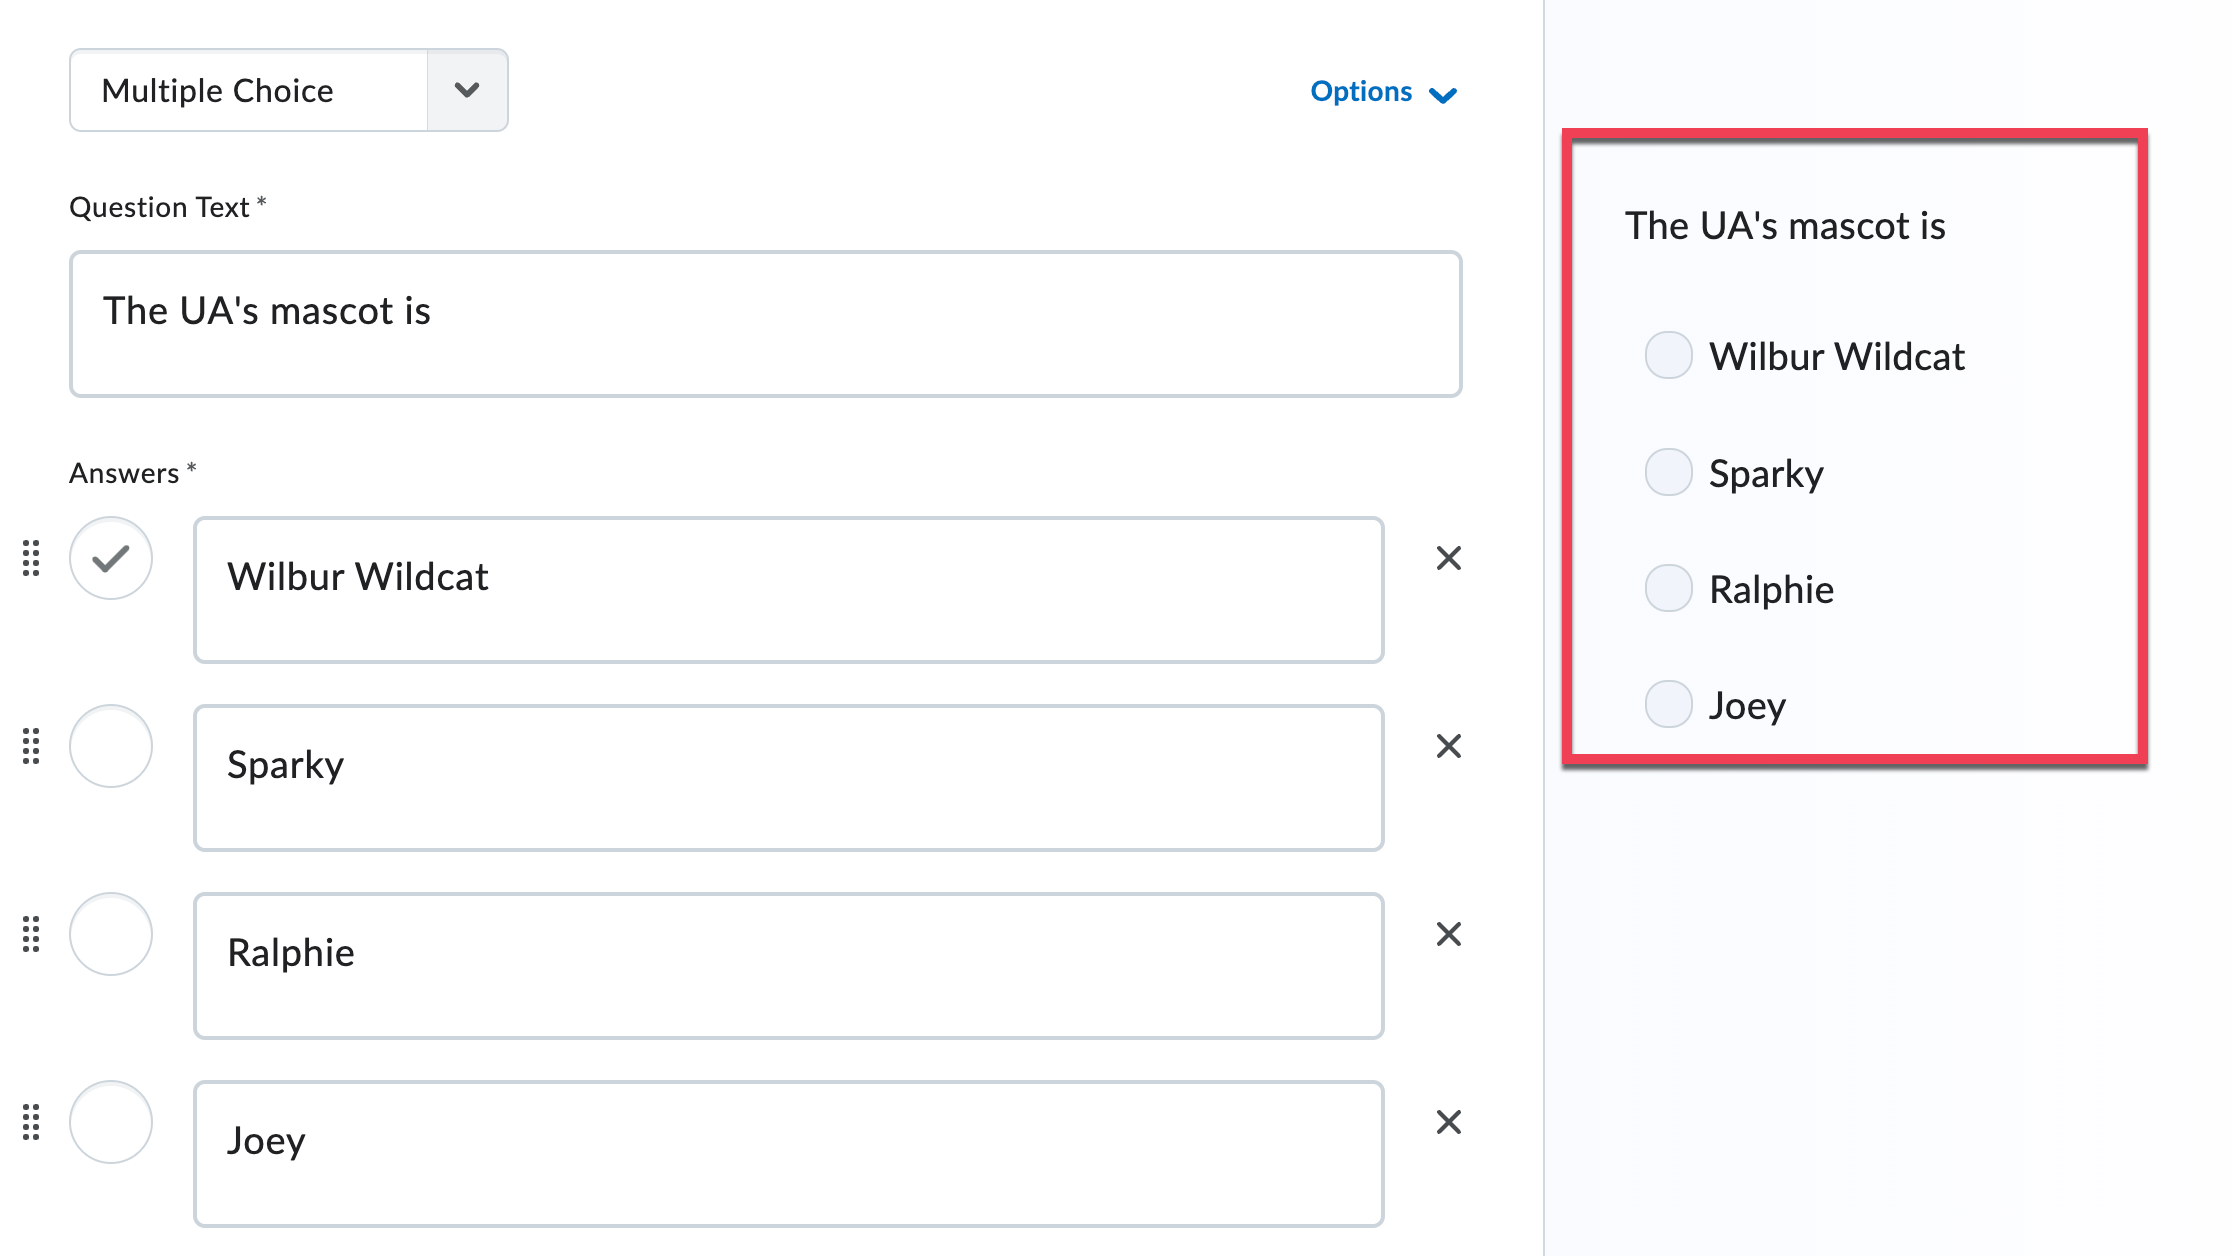
Preview the question to ensure it looks how you want; note that Brightspace automatically shows you how the question will appear on the quiz.
Step 13
Select the Save button to save your question.
Note
Select the down arrow next to the Save button for more options. Save and New will save your current question and open a new True/False question. Cancel will return you to the Question Library without saving your changes.
Create Multi-Select Questions
Step 1
Select Quizzes from the course navbar.
Step 2
Select the Question Library tab.
Note
You can also use the Create New button within an individual quiz, but our recommended workflow is to create questions in the Question Library so you can use them for multiple courses.
Step 3
Select the name of any Section folder to open it.
Step 4
Select the New button.
Step 5
Select Multi-Select Question (M-S) from the menu.
Step 6
Type or paste your question into the Question Text box.
Note
When pasting text, Brightspace will inherit any formatting (e.g., font type and size, indentations, etc.) embedded in the source document. We recommend that you remove all formatting and use the following keyboard shortcuts to paste your text: for PC, press CTRL+Shift+V; for MAC, press Command+Shift+V.
Step 7
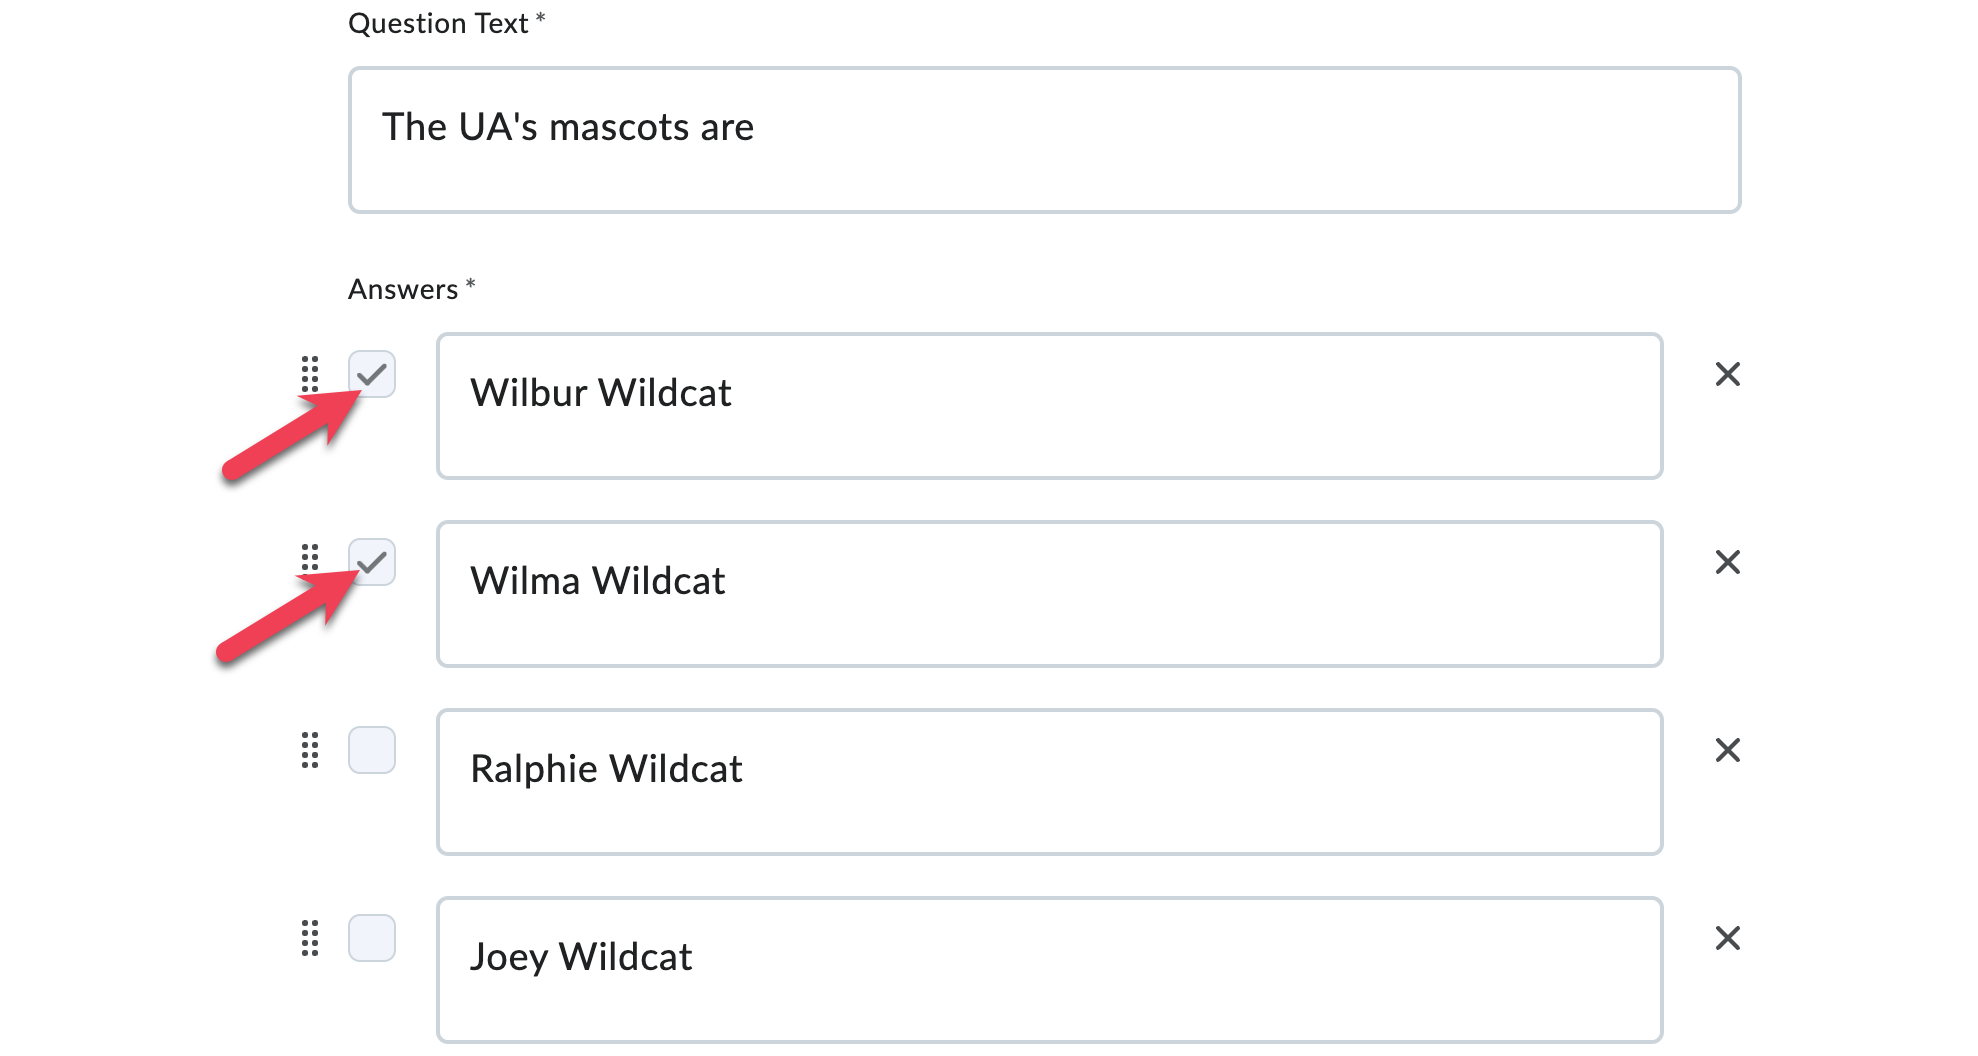
Enter the answers students can choose from. Select the checkboxes for the correct answers.
Step 8
Enter the number of points this question will be worth in the Points field.
Step 9
Select how Brightspace should assign points to blanks. The options are:
- All or Nothing: Students must select all the correct answers (and no incorrect answers) to receive points for this question.
- Correct Selections: Students receive points for each correct answer (includes points for answers the student correctly did not select).
- Correct Answers, Limited Selections: Students can only select a specified number of answers, and points are distributed across correct answers only.
- Right Minus Wrong: A student's score will equal points for each correct answer minus points for each incorrect answer (includes points for answers the student correctly did not select).
Note
If you select Correct Answers, Limited Selections, Brightspace tells students how many correct answers there are:

Step 10
Check Randomize answer order if you want the answer choices to appear differently for each student who takes the quiz.
Step 11
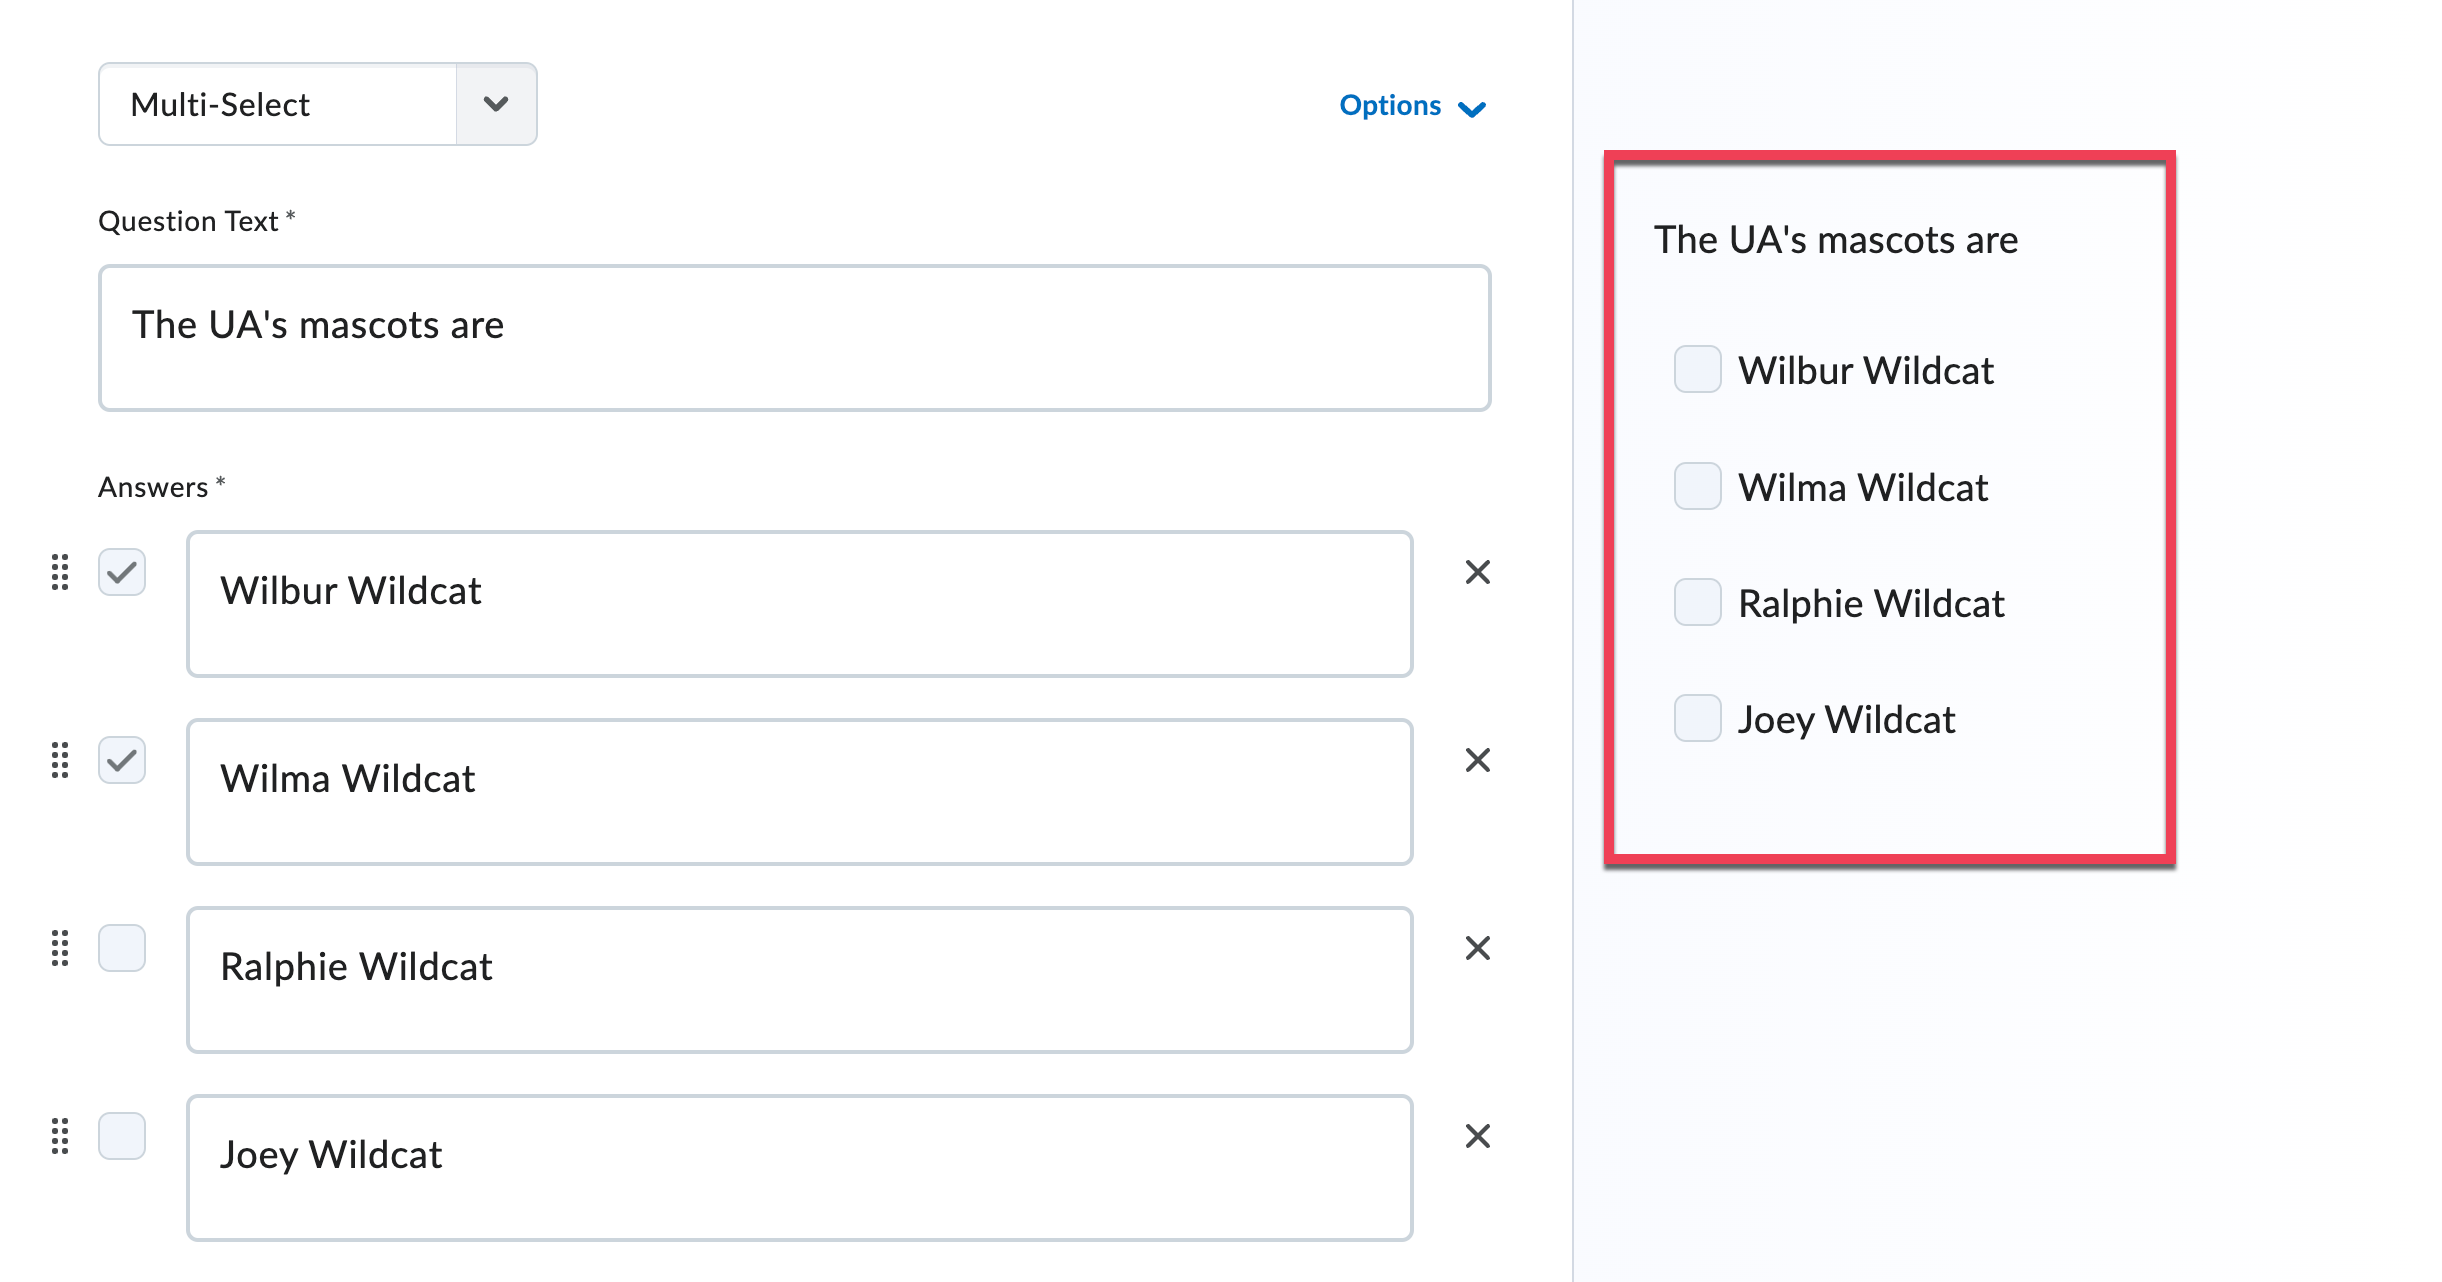
Preview the question on the right-hand side of the screen to ensure it looks how you want; note that Brightspace automatically shows you how the question will appear on the quiz.
Step 12
Select the Save button to save your question
Note
Select the down arrow next to the Save button for more options. Save and New will save your current question and open a new True/False question. Cancel will return you to the Question Library without saving your changes.
Create Matching Questions
Accessibility tip:
With matching questions, students match items in one list with items in a second list. This formatting of two lists and the need to cognitively and visually track items that are left to match presents difficulties for learners using a mobile device and for learners who are blind or have low vision.
Note
Based on best practices of Universal Design for Learning (opens in new tab), consider the use of matching questions carefully. It may be preferable to find an alternative.
Accessible Strategy
Consider using the Short Answer question type in tandem with the RegX Generator (opens in a new tab), which can help you create regular expressions, or algorithms that can be used to machine grade short answer, fill-in-the-blank, arithmetic, and significant figures questions. Contact the Instructional Technology team if you have questions on how to get started with the RegX Generator.
Step 1
Select Quizzes from the course navbar.
Step 2
Select the Question Library tab.
You can also use the Create New button within an individual quiz, but our recommended workflow is to create questions in the Question Library so you can use them for multiple courses.
Step 3
Select the name of any Section folder to open it.
Step 4
Select the New button.
Step 5
Select Matching Question (MAT) from the menu.
Note
We recommend leaving the Title field blank. The Question Text will become the title by default, allowing you to see the question without selecting it to open it.
Step 6
Enter the number of points this question will be worth in the Points field.
Step 7
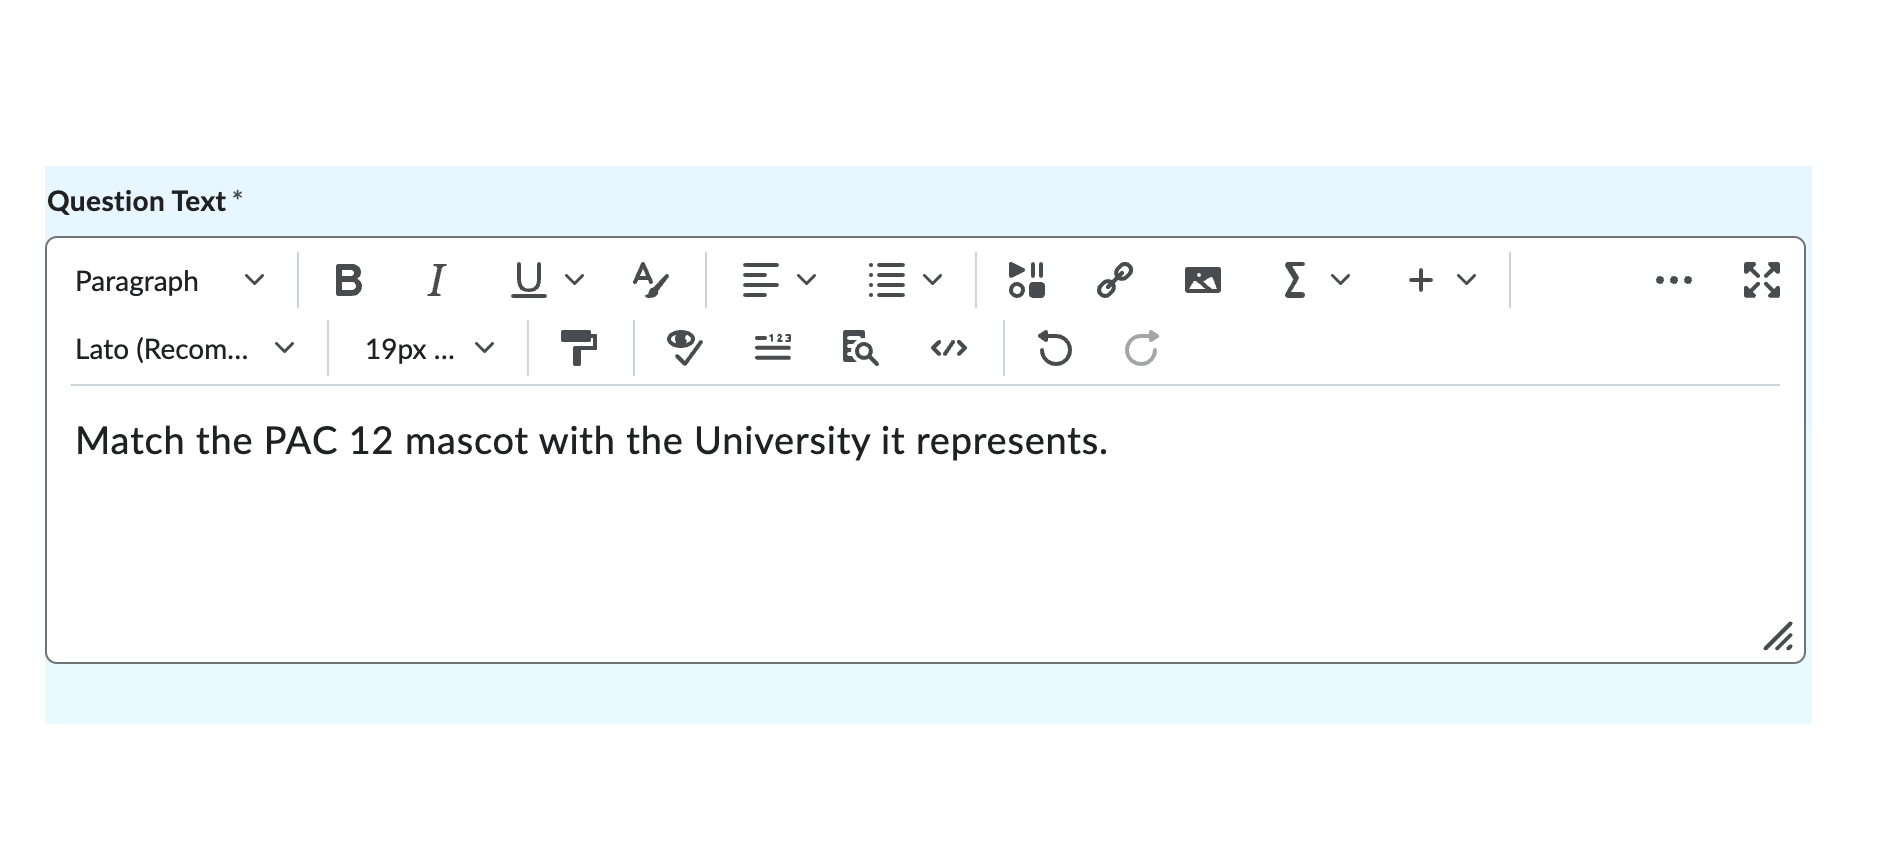
Type or paste your question into the Question Text box.
Note
When pasting text, Brightspace will inherit any formatting (e.g., font type and size, indentations, etc.) embedded in the source document. To remove all formatting when pasting your text into Brightspace, use the following keyboard shortcuts: PC users press CTRL+Shift+V; MAC users press Command+Shift+V.
Step 8
If this question has an image, select the Insert Image button to upload it from your computer. Use the Description field to provide information about the image.
Step 9
Select how Brightspace should mark correct answers:
- Equally Weighted: Students receive points for each correct match. Brightspace will automatically do the calculations based on how many points the question is worth.
- All or Nothing: Students must select all the correct matches (and no incorrect matches) to receive points for this question.
- Right Minus Wrong: A student's score equals points for each correct match minus points for each incorrect match (to include correct matches not selected).
Step 10
Create the appropriate number of choices (this is the list of items students match to). Type or paste the choices into the Choices Value fields.
- Select the Add Choice (plus sign icon) to add more choice fields.
- Select the Remove Choice (trashcan icon) to remove choice fields.

Step 11
Create the appropriate number of matches (this is the list of items that students match to the choices created in step 10). Type or paste the matches into the Matches Value fields.
- Select the Add Match (plus sign icon) to add an additional matching option.
- Select the Remove Match (trashcan icon) to delete any unneeded matches.

Step 12
Use the dropdown menus in the Correct Choice column to create your matches. Select "1" to connect a match to the first item in the choices list. Select "2" to connect a match with the second item in the choices list, and so forth.

Step 13
Select the Preview button to see how the question will look to students.
Step 14
Select the Save button to save your question.
Create Ordering Questions
Step 1
Select Quizzes from the course navbar.
Step 2
Select the Question Library tab.
Note
You can also use the Create New button within an individual quiz, but our recommended workflow is to create questions in the Question Library so you can use them for multiple courses.
Step 3
Select the name of any Section folder to open it.
Step 4
Select the New button.
Step 5
Select Ordering Question (ORD) from the menu.
Note
We recommend leaving the Title field blank. The Question Text will become the title by default, allowing you to see the question without selecting it to open it.
Step 6
Enter the number of Points this question will be worth.
Step 7
Type or paste your question into the Question Text box.
Note
When pasting text, Brightspace will inherit any formatting (e.g., font type and size, indentations, etc.) embedded in the source document. To remove all formatting when pasting your text into Brightspace, use the following keyboard shortcuts: PC users press CTRL+Shift+V; Mac users press Command+Shift+V.

Step 8
If this question has an image, select the Insert Image button to upload it from your computer. Use the Description field to provide information about the image.
Step 9
Select how Brightspace should mark correct answers:
- Equally Weighted: Students receive points for every item that is in the correct order. Brightspace will calculate this automatically based on the number of points the question is worth.
- All or Nothing: Students must order all items correctly to receive points for this question.
- Right Minus Wrong: A student's score equals points for each correctly ordered item minus points for each incorrectly ordered item.
Step 10
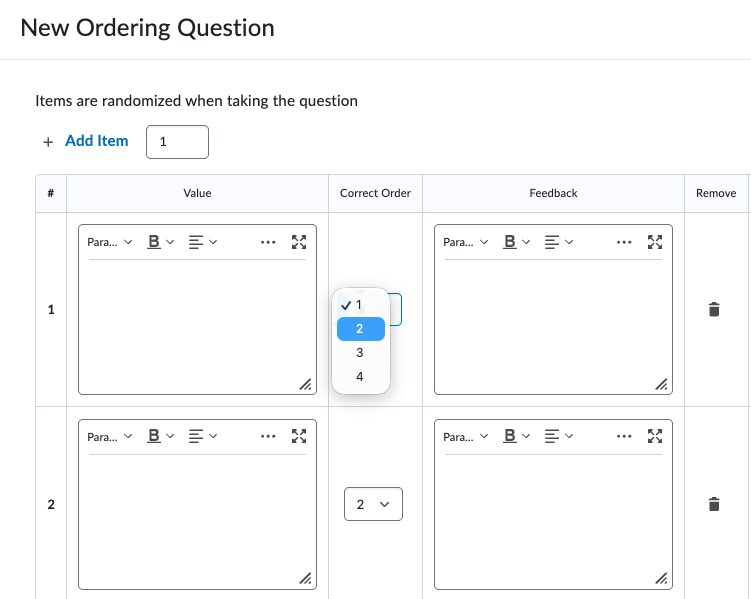
Create the appropriate number of items that students must put in order. Type or paste the answer choices into the Value fields.
- Select the Add Item (plus sign icon) to add an additional answer choice.
- Select the Remove Item (trashcan icon) to delete any unneeded answer choices.
Step 11
Use the Correct Order drop-down menus to put your items in the correct order.
Step 12
Select the Preview button to see how the question will look to students.
Step 13
Select the Save button to save your question.
Create Likert Questions
Note
Likert Questions can only be used within the Surveys tool and, therefore, are not available to import into a quiz.
Step 1
Select Quizzes from the course navbar.
Step 2
Select the Question Library tab.
Note
You can also use the Create New button within an individual survey, but our recommended workflow is to create questions in the Question Library so you can use them for multiple courses.
Step 3
Select the name of any Section folder to open it.
Step 4
Select the New button.
Step 5
Select Likert Question (LIK) from the menu.
Note
We recommend leaving the Title field blank. The Question Text will become the title by default, allowing you to see the question without selecting it to open it.
Step 6
Add instructions explaining how participants should reply to each question in the Introductory Text field.
Note
When pasting text, Brightspace will inherit any formatting (e.g., font type and size, indentations, etc.) embedded in the source document. We recommend that you remove all formatting and use the following keyboard shortcuts to paste your text: for PC, press CTRL+Shift+V; for MAC, press Command+Shift+V.
Step 7
If you want to add an image, select the Insert Image button to upload it from your computer. Use the Description field if you want to provide information about the image.
Step 8
Select the round radio button to indicate the Scale that you wish to use. Options:
- One to Five (1 -5)
- One to Eight (1 - 8)
- One to Ten (1 - 10)
- Agreement Scale (Disagree - Agree)
- Satisfaction Scale (Dissatisfied - Satisfied)
- Frequency Scale (Never - Always)
- Importance Scale (Unimportant - Important)
- Opposition Scale (Oppose - Support)
Step 9
Create the appropriate number of statements you want participants to evaluate. Add the statements (people will evaluate) in the Value fields: one statement per field.
- Select the Add Option (plus sign icon) to add an additional statement.
- Select the Remove Entry (trashcan icon) to delete any unneeded statement field.
Step 10
Select the Preview button to see how the question will look to students.
Step 11
Select the Save button to save your question.
About Open Ended Questions
Open-ended questions require students to respond with original answers. These types of questions range from one-word responses to full essays. Typically, open-ended questions are manually graded. To facilitate manual grading, instructors can attach rubrics to individual open-ended questions. Brightspace can also machine grade open-ended questions provided students' responses are an exact match to the correct answer or if Regular Expressions are used to account for variations.
Create Fill-in-the-blank(s) Questions
Step 1
Select Quizzes from the course navbar.
Step 2
Select the Question Library tab.
Note
You can also use the Create New button within an individual quiz, but our recommended workflow is to create questions in the Question Library so you can use them for multiple courses.
Step 3
Select the name of any Section folder to open it.
Step 4
Select the New button.
Step 5
Select Fill in the Blanks Question (FIB) from the menu.
Note
We recommend leaving the Title field blank. The Question Text will become the title by default, allowing you to see the question without selecting to open it.
Step 6
Enter the number of points this question will be worth in the Points field.
Step 7
If this question has an image, select the Insert Image button to upload it from your computer. Use the Description field to provide information about the image.
Step 8
Set up the structure of your Fill in the blank question. By default, this question consists of a starting text field, a blank, and a finishing text field.
Step 8a
If you want students to have more than one answer blank, select the Add Blank (plus sign) icon
Step 8b
Unless the blank needs to be at the end of the phrase, sentence, or paragraph, you will need to add a text field, which you do by selecting the Add Text (plus sign) icon.
Step 8c
Use the Remove Answer (trashcan) icon to the right of any blank or text field you want to delete.
Step 9
Enter the text of your sentence(s) within the text field(s).
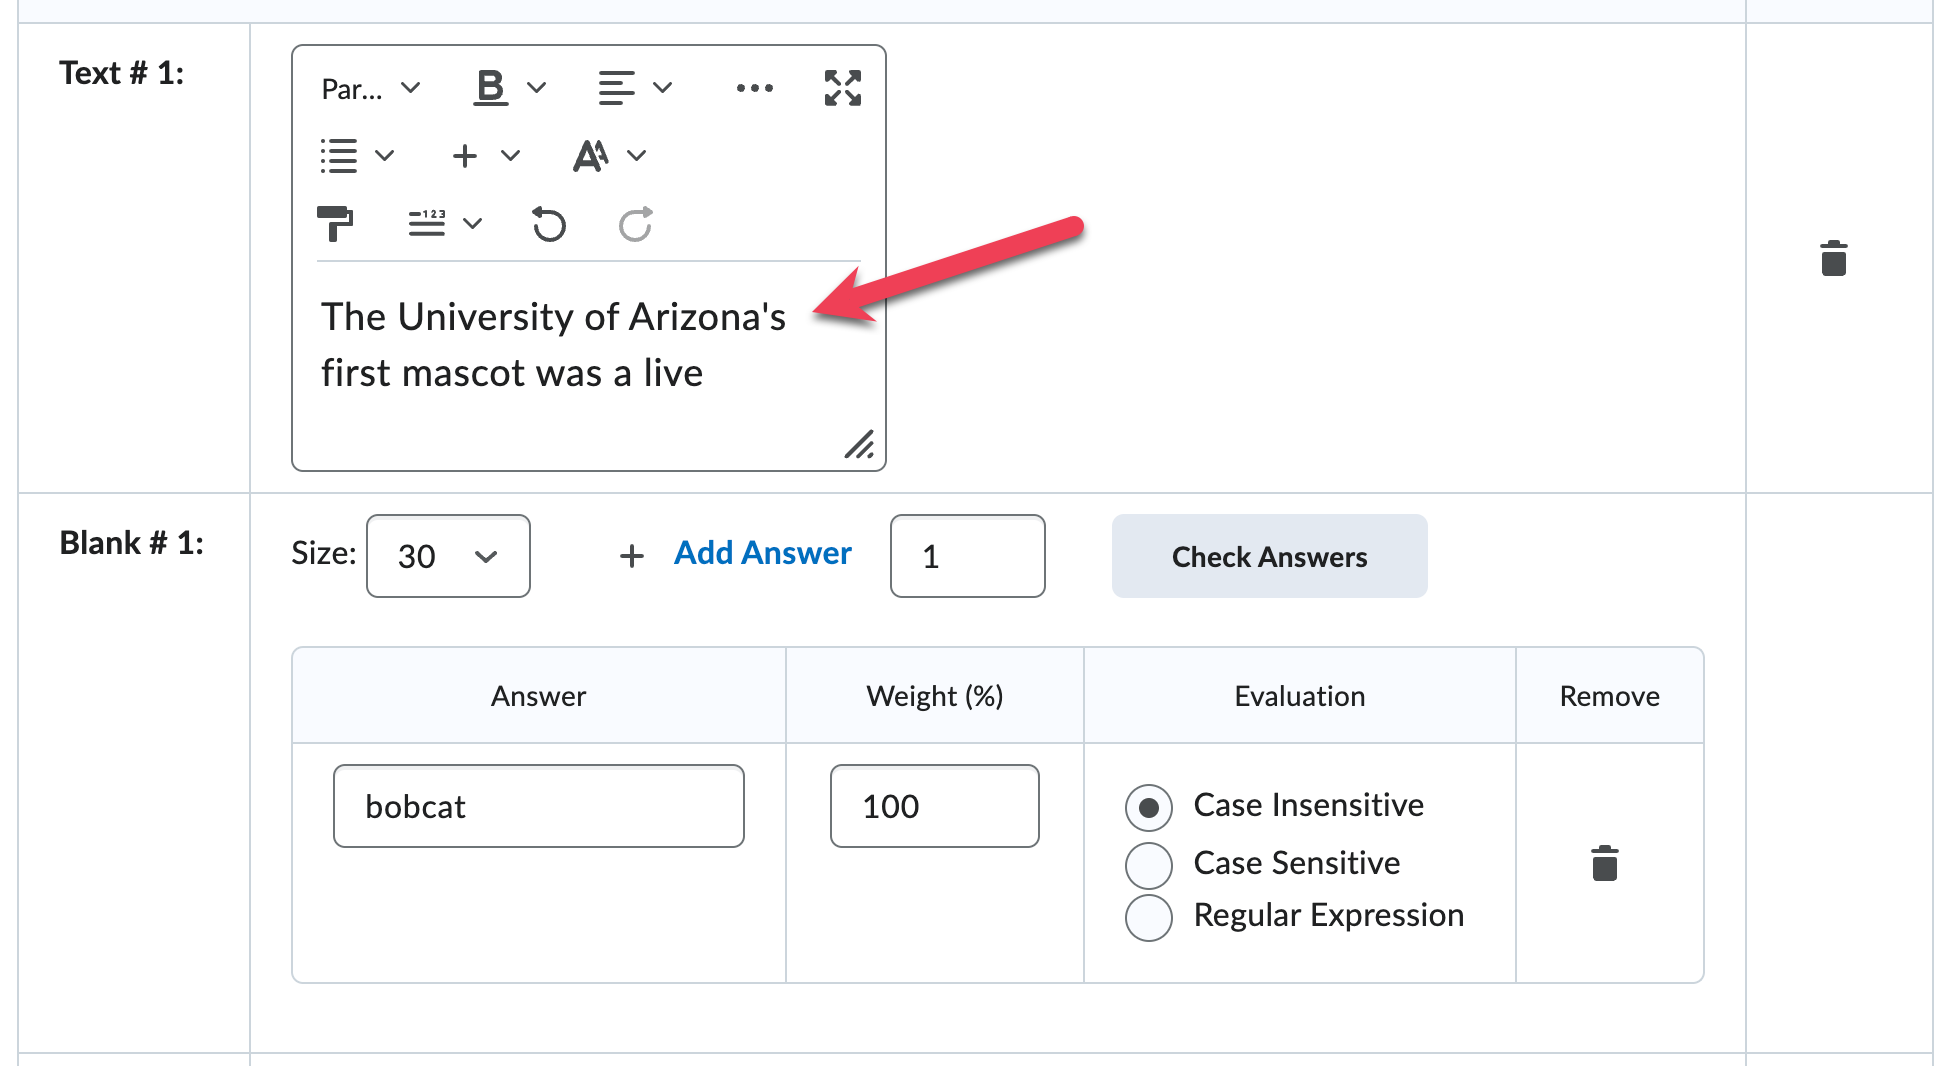
Note
When pasting text, Brightspace will inherit any formatting (e.g., font type and size, indentations, etc.) embedded in the source document. We recommend that you remove all formatting and use the following keyboard shortcuts to paste your text: for PC, press CTRL+Shift+V; for Mac, press Command+Shift+V.
Step 10
Enter the correct answer(s) in the blank field(s).
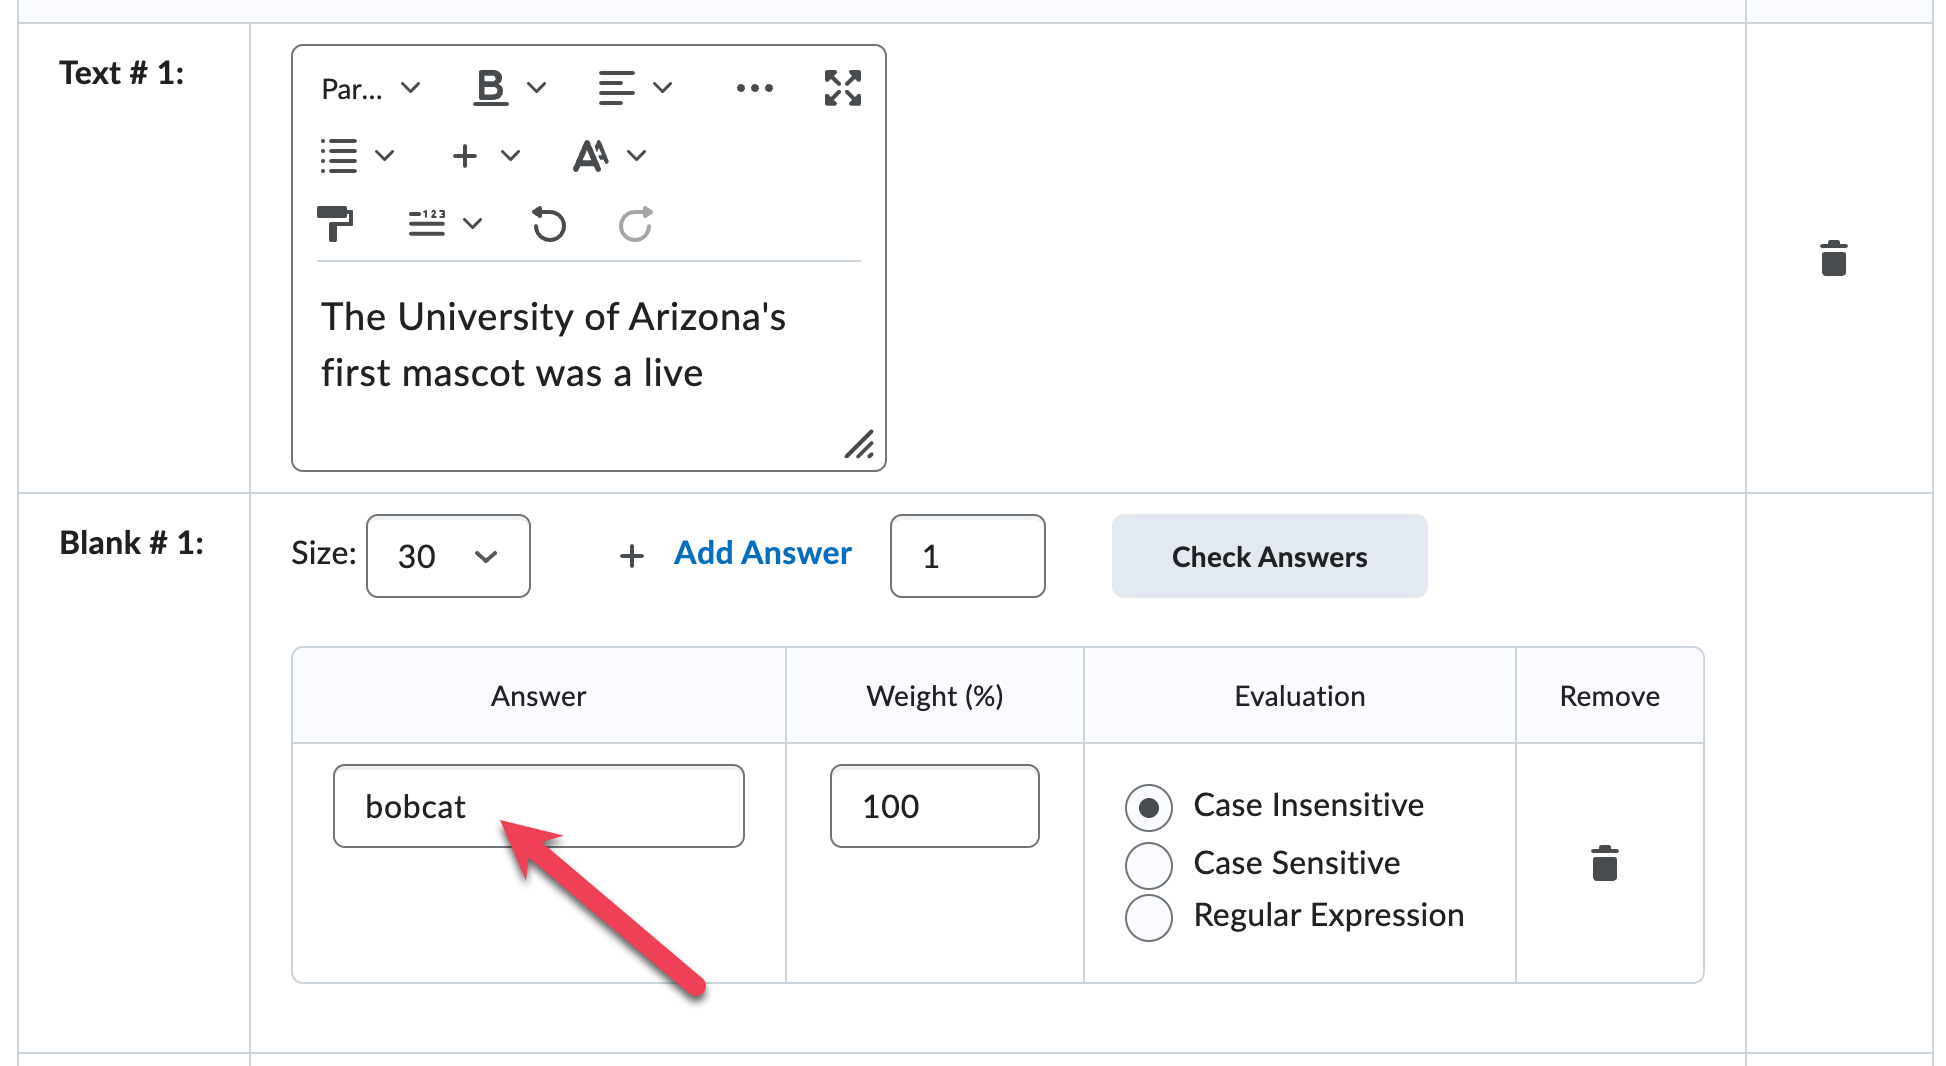
Note
Brightspace can auto-grade Fill in the blank questions if the student's answer is an exact match to the answer you provide or if Regular Expressions are used.
Step 11
Specify how you want Brightspace to assess the question.

Step 11b
Select the radio button to indicate the evaluation criteria you want Brightspace to use for each answer:
- Case Insensitive: capitalization does not affect the score.
- Case Sensitive: proper capitalization is required.
- Regular Expression: uses letters and other symbols to create a pattern that describes a range of acceptable text strings. For an introduction to Regular Expressions, watch this Brightspace video (opens in new tab) and/or see Auto-Grading Options, Regular Expressions.
Step 11c
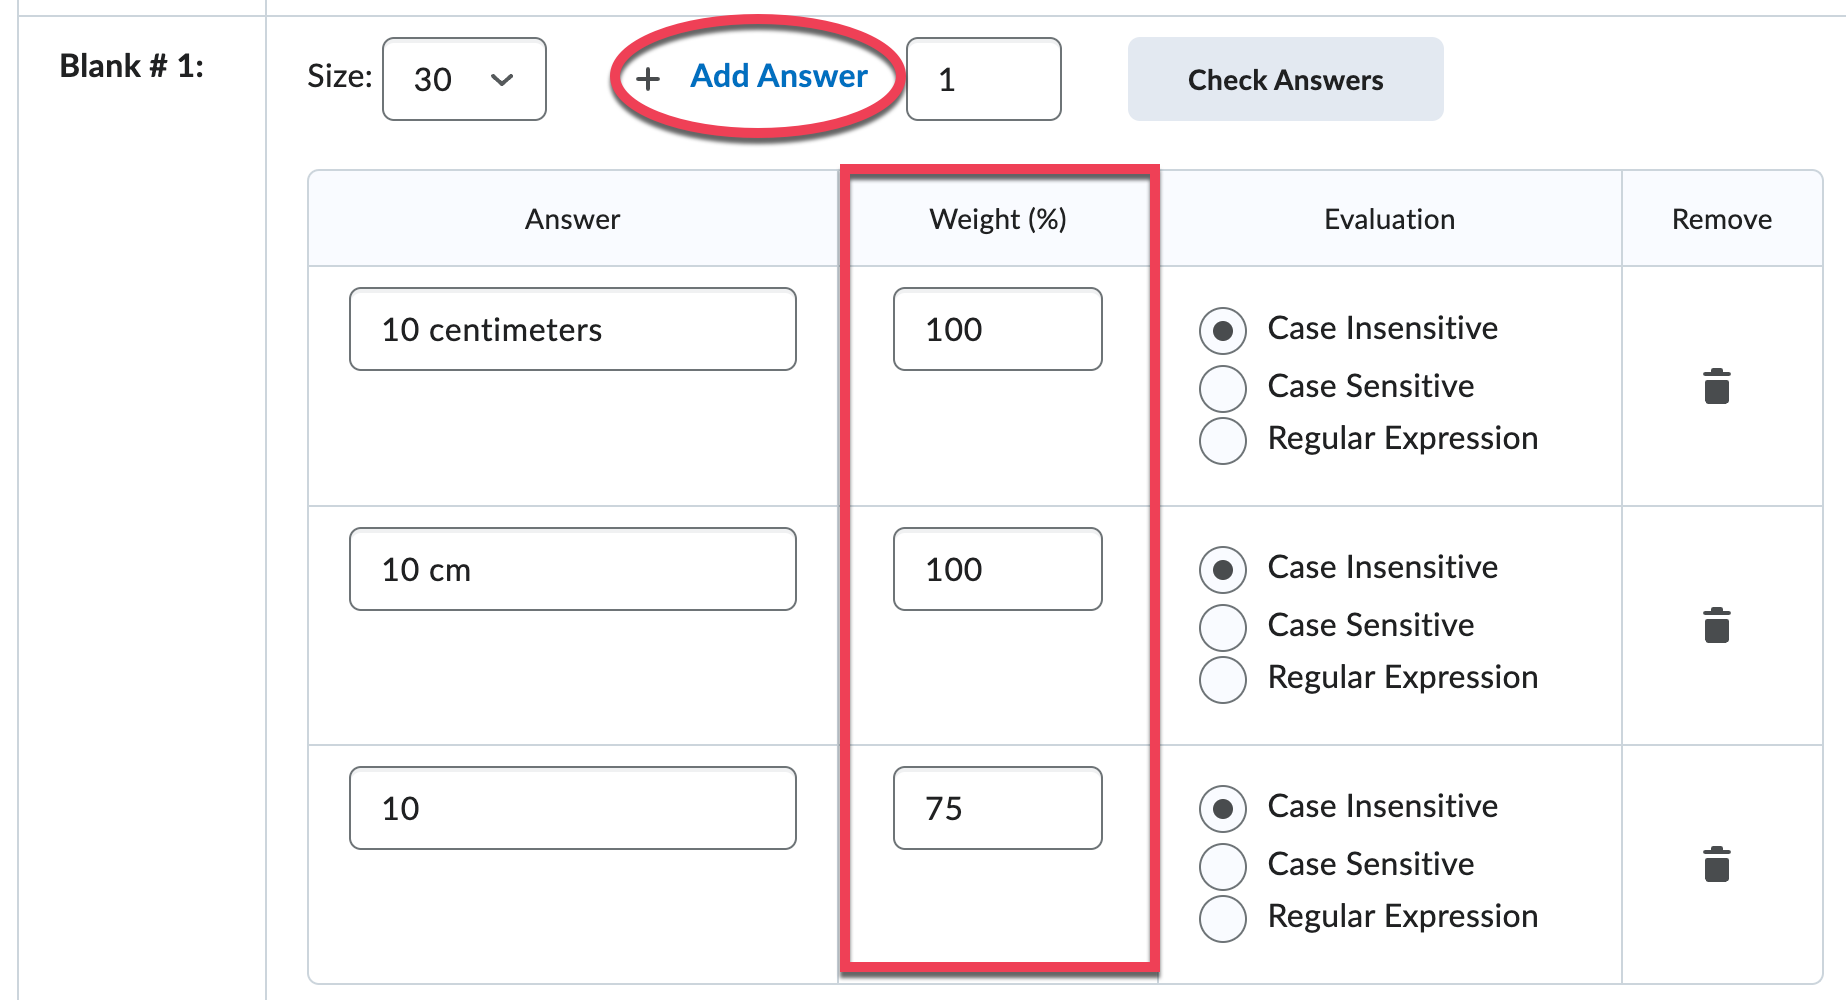
Create variations on the correct answer. For example, if the correct answer is "10 cm", you will give partial credit for the answer "10." Select the Add Answer option and assign a partial weight for the additional answer(s).
Step 12
Select the Preview button to see how the question will look to students.
Step 13
Select the Save button to save your question.
Create Short Answer Questions
Note
Short answer questions work well when used with an image, for example, an image of a brain with itemized parts that students must label or a numbered map for which students must provide place names. In cases where spelling, wording, and answer order are exact, Brightspace can auto-grade.
Step 1
Select Quizzes from the course navbar.
Step 2
Select the Question Library tab.
Note
You can also use the Create New button within an individual quiz, but our recommended workflow is to create questions in the Question Library so you can use them for multiple courses.
Step 3
Select the name of any Section folder to open it.
Step 4
Select the New button.
Step 5
Select Short Answer Question (SA) from the menu.
Note
We recommend leaving the Title field blank. The Question Text will become the title by default, allowing you to see the question without selecting to open it.
Step 6
Type or paste your question into the Question Text field.
Note
Select the Question Text field to open a toolbar to add pictures and media to your question.
Note
When pasting text, Brightspace will inherit any formatting (e.g., font type and size, indentations, etc.) embedded in the source document. We recommend that you remove all formatting and use the following keyboard shortcuts to paste your text: for PC, press CTRL+Shift+V; for Mac, press Command+Shift+V.
Step 7
Select the Add Blank button until you have the desired number of answer choices for this question.
Step 8
Type or paste the correct answers into the Answers fields—one answer per blank. The order of the answers does matter.
Note
These questions are meant for single-word or short-phrase responses. You cannot change the size of the answer box, although the size does not limit how much text students can enter.
Step 9
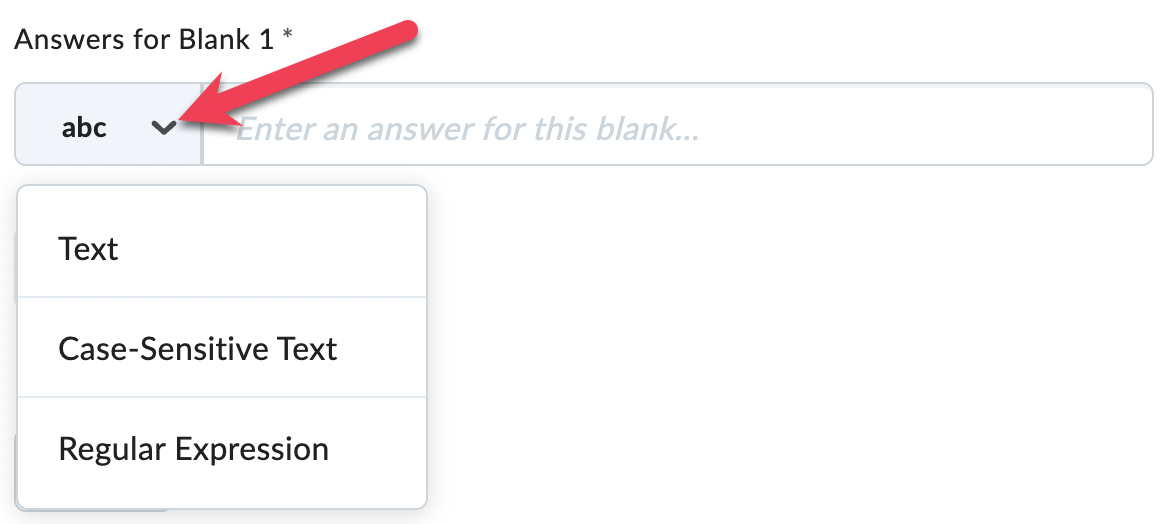
For each answer, use the dropdown menu to select one of the following:
- Text: if the answer is not case-sensitive.
- Case-Sensitive Text: if letter case matters.
- Regular Expression: uses letters and other symbols to create a pattern that describes a range of acceptable text strings. For an introduction to Regular Expressions, watch this Brightspace video (opens in new tab) and/or see Auto-Grading Options, Regular Expressions.
Step 10
Enter the number of points the question is worth in the Default Points field.
Step 11
To designate how points will be assigned to blanks, use the dropdown menu and select one of the following:
- Students will receive part marks: students receive points for every correct answer; Brightspace automatically calculates based on the number of points the question is worth.
- Students must answer all blanks correctly: Brightspace will give points only if a student provides all the correct answers.
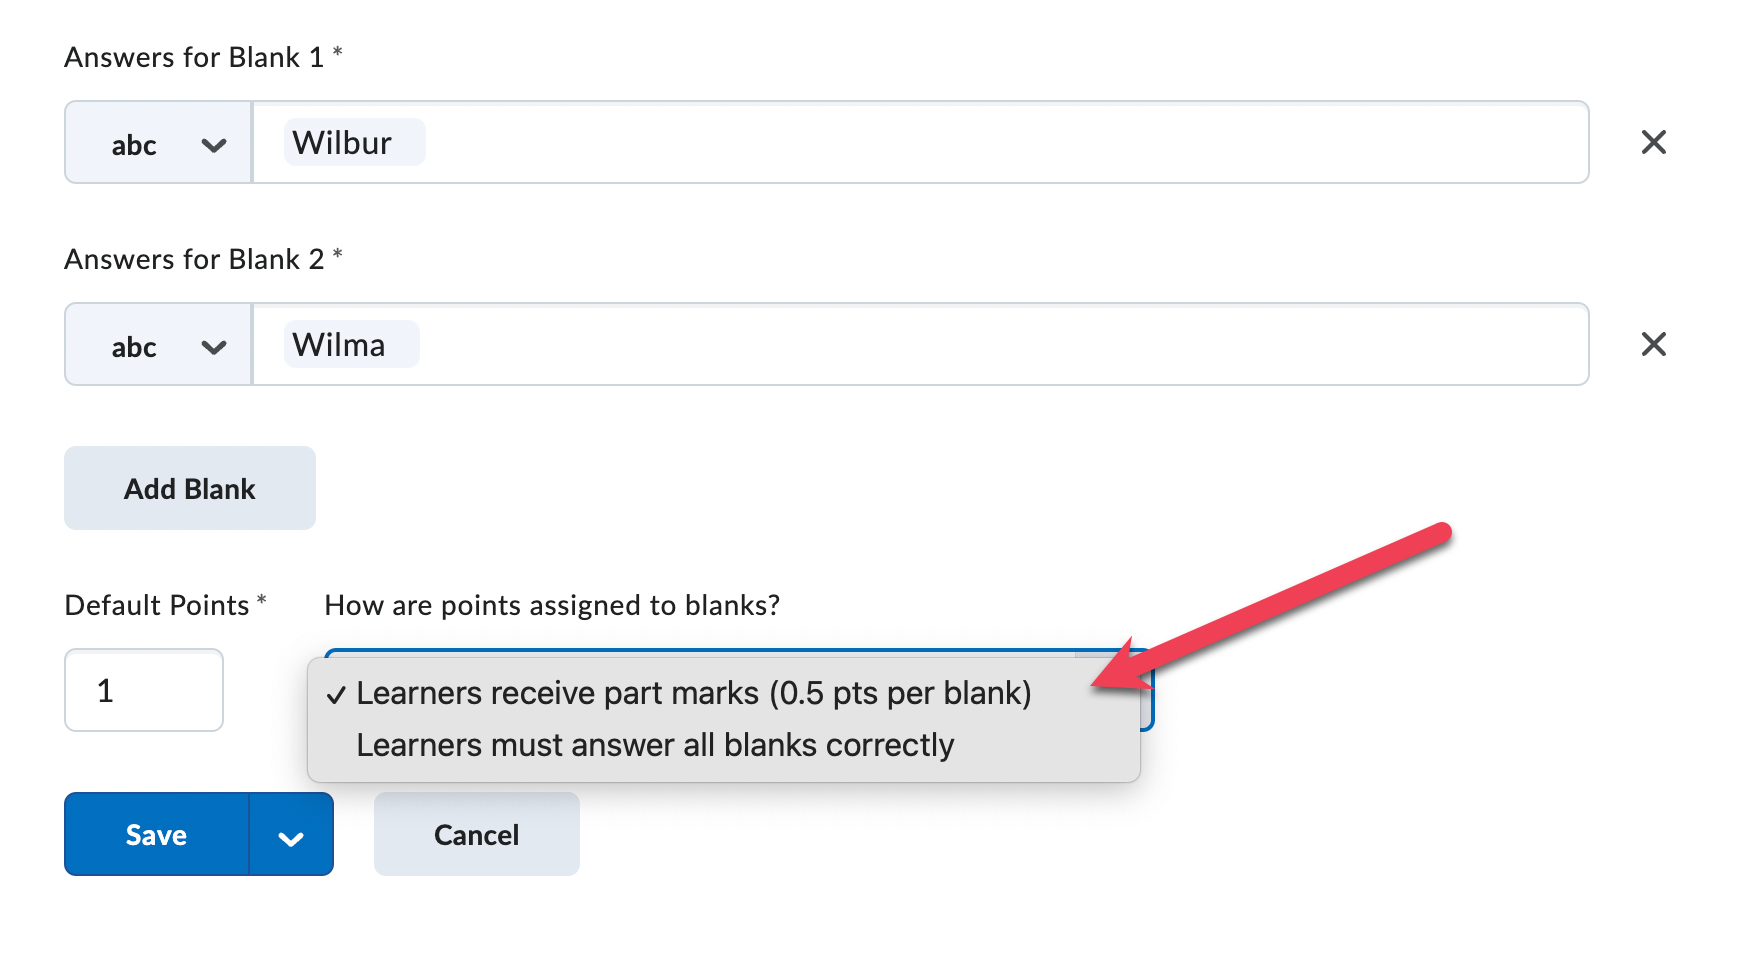
Step 12
Preview the question on the right-hand side of the screen to ensure it looks how you want; note that Brightspace automatically shows you how the question will appear on the quiz.
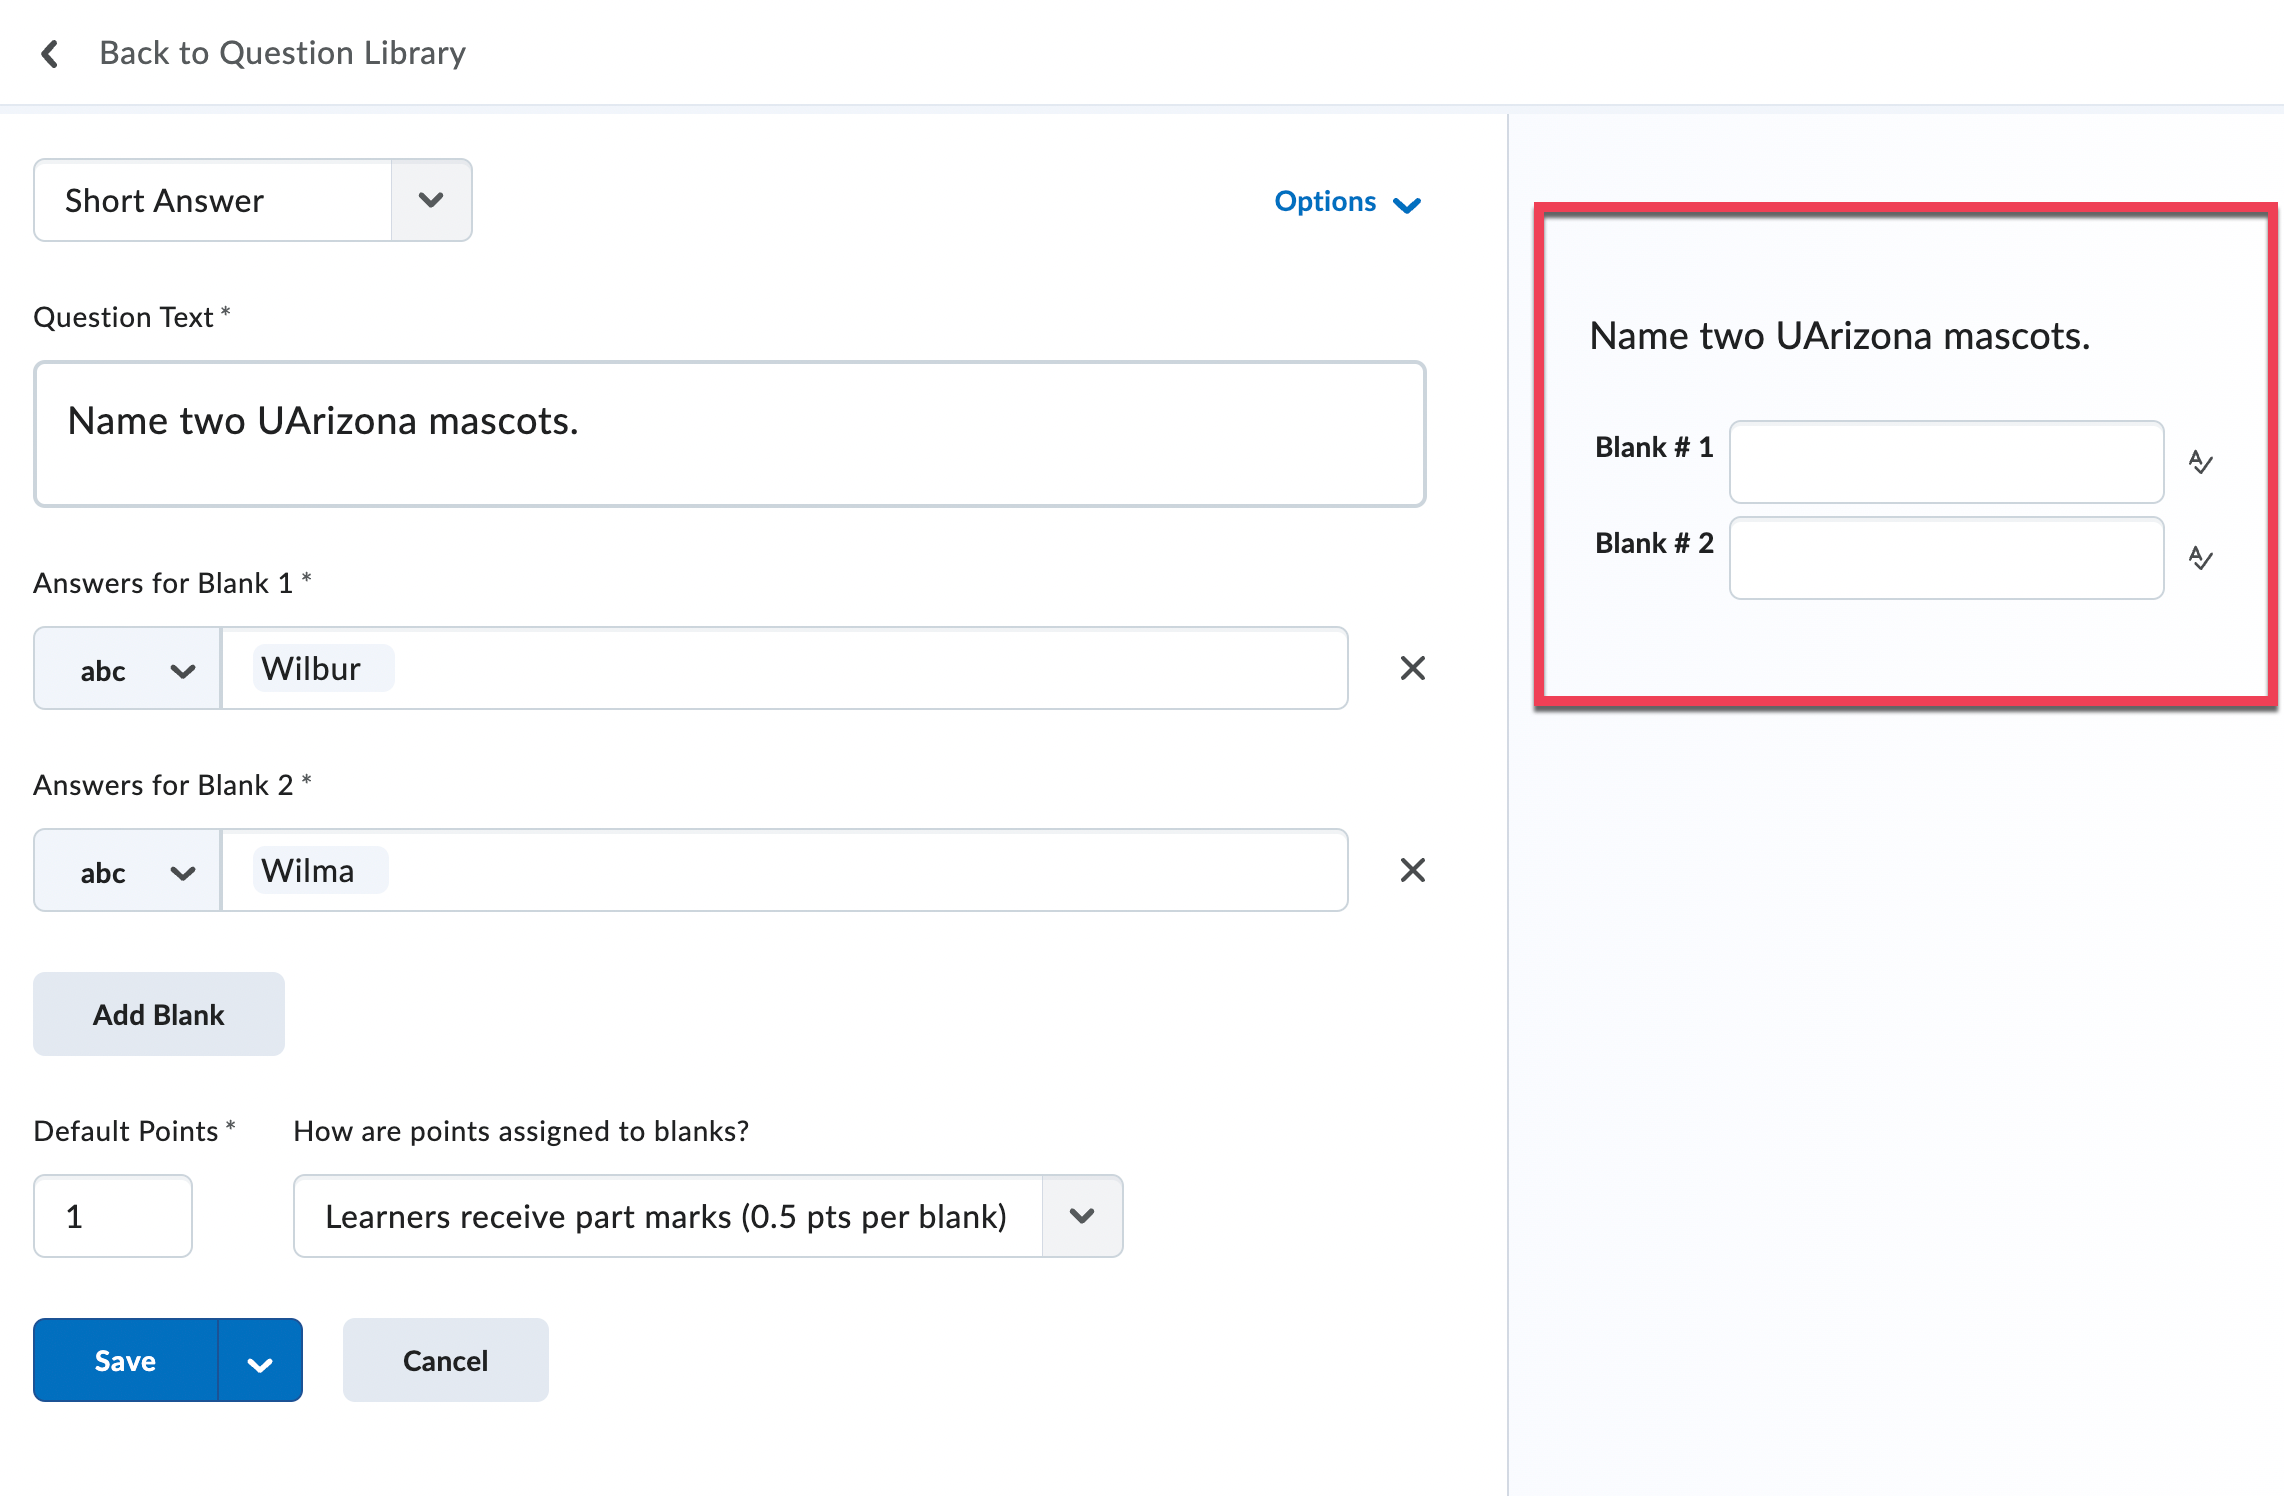
Step 13
Select the Save button to save your question.
Note
Select the Save Actions Menu icon for more options. Save and New will save your current question and open a new True/False question. Cancel will return you to the Question Library without saving your changes.
Create Multi-Short Answer Questions
These questions allow for multiple correct answers to a single question prompt. For example, students can be asked to name any 4 of the 50 state capitols.
Step 1
Select Quizzes from the course navbar.
Step 2
Select the Question Library tab.
Note
You can also use the Create New button within an individual quiz, but our recommended workflow is to create questions in the Question Library so you can use them for multiple courses.
Step 3
Select the name of any Section folder to open it.
Step 4
Select the New button.
Step 5
Select Multi-Short Answer Question (MSA) from the menu.
Note
We recommend leaving the Title field blank. The Question Text will become the title by default, allowing you to see the question without selecting to open it.
Step 6
Enter the number of points this question will be worth in the Points field.
Step 7
Type or paste your question into the Question Text field.
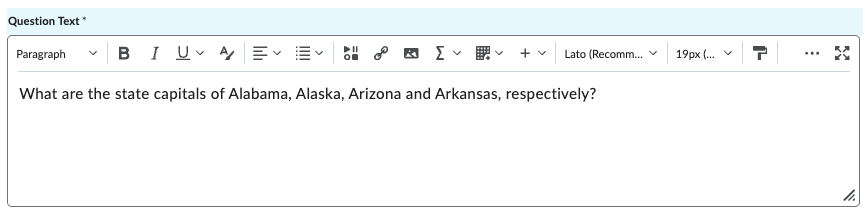
Step 8
If this question has an image, select the Insert Image button to upload it from your computer. Use the Alternative Text field to provide information about the image.
Step 9
Create the number of answers in the Input Boxes field – one box for each answer you expect students to provide.
Step 10
Size the answer fields by adjusting the number of Rows and Columns that will fit each.
Note
The size of the answer field does not restrict how much text a student can enter. They provide an idea of how long you expect each answer to be.
Step 11
Add Answer fields by entering the number of fields you need (e.g., one for each of the 50 state capitols) in the Add Answers field and selecting the Add Answer button.
Step 12
Enter the correct answers into the Answer fields.
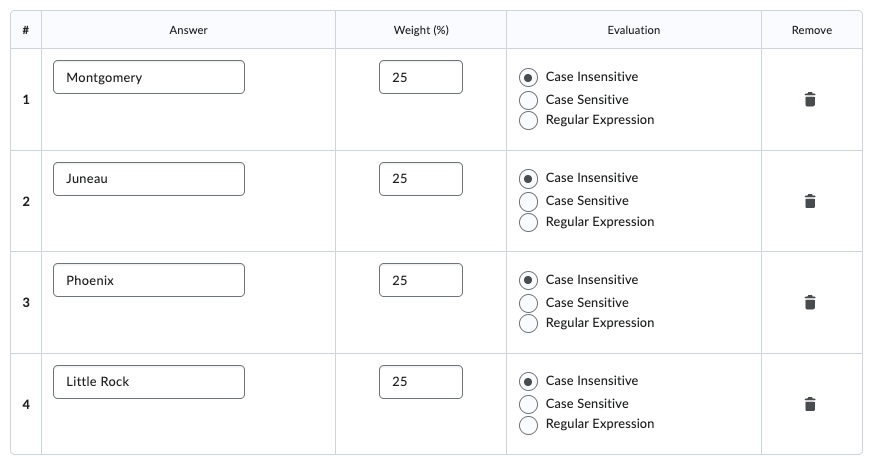
Step 13
Enter the appropriate weight in the Weight field. For example, the student must provide four answers in the capital example. That means each answer equals 25% of the question's value (5 answers mean each answer is worth 20%, six answers mean each answer is worth 16.66%, and so forth).
Step 14
Select the radio button for the Evaluation criteria you want to use for each answer:
- Case Insensitive: capitalization does not affect the score.
- Case Sensitive: proper capitalization is required.
- Regular Expression: uses letters and other symbols to create a pattern that describes a range of acceptable text strings. For an introduction to Regular Expressions, watch this Brightspace video (opens in new tab) and/or see Auto-Grading Options, Regular Expressions.
Step 15
Select the Save button to save your question, or Save and Close to save and return to the Question Library.
Create Written Response Questions
Written Response questions allow students to provide answers ranging from a single sentence to multiple paragraphs. This flexibility makes them ideal when students must explain complex ideas, show their work on mathematical problems, or submit files such as images, videos, or supporting documents. While this question type usually requires manual grading, rubrics may be attached to questions in order to streamline the evaluation process and ensure consistency.
Step 1
Select Quizzes from the course navbar.
Step 2
Select the Question Library tab.
Note
You can also use the Create New button within an individual quiz, but our recommended workflow is to create questions in the Question Library so you can use them for multiple courses.
Step 3
Select the name of any Section folder to open it.
Step 4
Select the New button.
Step 5
Select Written Response Question (WR) from the menu.
Note
We recommend leaving the Title field blank. The Question Text will become the title by default, allowing you to see the question without selecting to open it.
Step 6
Type or paste your question into the Question Text field.
Note
When pasting text, Brightspace will inherit any formatting (e.g., font type and size, indentations, etc.) embedded in the source document. We recommend that you remove all formatting and use the following keyboard shortcuts to paste your text: for PC, press CTRL+Shift+V; for Mac, press Command+Shift+V.
Step 7
Enter the number of points the question is worth in the Default Points field.
Step 8
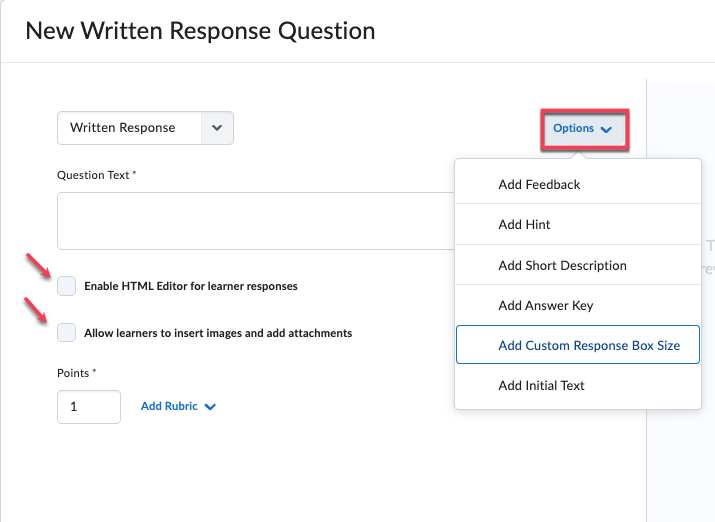
Select the Options menu.
Step 9
(Optional) Select Add Custom Response Box Size.
Note
Customizing the response box size indicates to students how long you expect their answers to be. The box size does not limit the amount of text a student can enter.
Step 10
(Optional) In the Custom Response Box Size dropdown menu, select the size of the response box you want to appear on the quiz. The options are:
- Default size, about a paragraph
- A bit shorter, just a sentence
- Much longer, expecting an essay
Step 11
(Optional) Add an answer key that only graders, TAs, and instructors can view in the Answer Key (for evaluators) field.
Step 12
(Optional) To allow students to embed images or to attach files to their answers, select the checkbox for Enable HTML Editor for learner responses and the checkbox for Allow learners to insert images and add attachments. Selecting both checkboxes will allow students to either insert images using the HTML editor or attach images using the Add File option.
Note
To review image or video submissions as embedded media rather than a link which must be selected to view the submission, select only Enable HTML Editor for learner responses. This setting allows students to embed images or videos using the Insert Stuff button (opens in a new tab).
Note
The maximum file size for a single attached file or embedded image is 102400 KB (100MB). The maximum for all of a student's attached/embedded files to the question is 102400 KB (100MB).
Step 13
Optional: Attach a rubric to a Written Response question. Add a rubric by selecting the Add Rubric button. Choose Create New or Add Existing and follow any additional prompts. For more information on rubrics, visit Rubrics (opens in new tab).
Step 14
Preview the question on the right-hand side of the screen to ensure it looks how you want; note that Brightspace automatically shows you how the question will appear on the quiz.

Step 15
Select the Save button to save your question.
Note
Select the Save Actions Menu icon for more options. Save and New will save your current question and open a new True/False question. Cancel will return you to the Question Library without saving your changes.
About Math Questions
Formula question types are most commonly used in math and science courses. They allow you to use "curly braces" to ensure each student receives a unique question. Also, you can deduct points when a student answers with an incorrect number of decimal points, a unit of measurement, or scientific notation.
Note
To create complex formulas, you can use the Brightspace built-in Graphical Equation editor when building your question.
Create Arithmetic Questions
These questions include formulas. You can specify the number of decimal points and units required and set a level of "tolerance" for what counts as an acceptable answer.
Note
If you want students to show their calculations and/or explain their work, we recommend using Written Response (WR) question types.
Step 1
Select Quizzes from the course navbar.
Step 2
Click on the Question Library tab.
Note
You can also use the Create New button within an individual quiz, but our recommended workflow is to create questions in the Question Library so you can use them for multiple courses.
Step 3
Click on the name of any Section folder to open it.
Step 4
Click the New button.
Step 5
Select Arithmetic Question (2+2) from the menu.
Step 6
Enter the number of points this question will be worth in the Points field.
Step 7
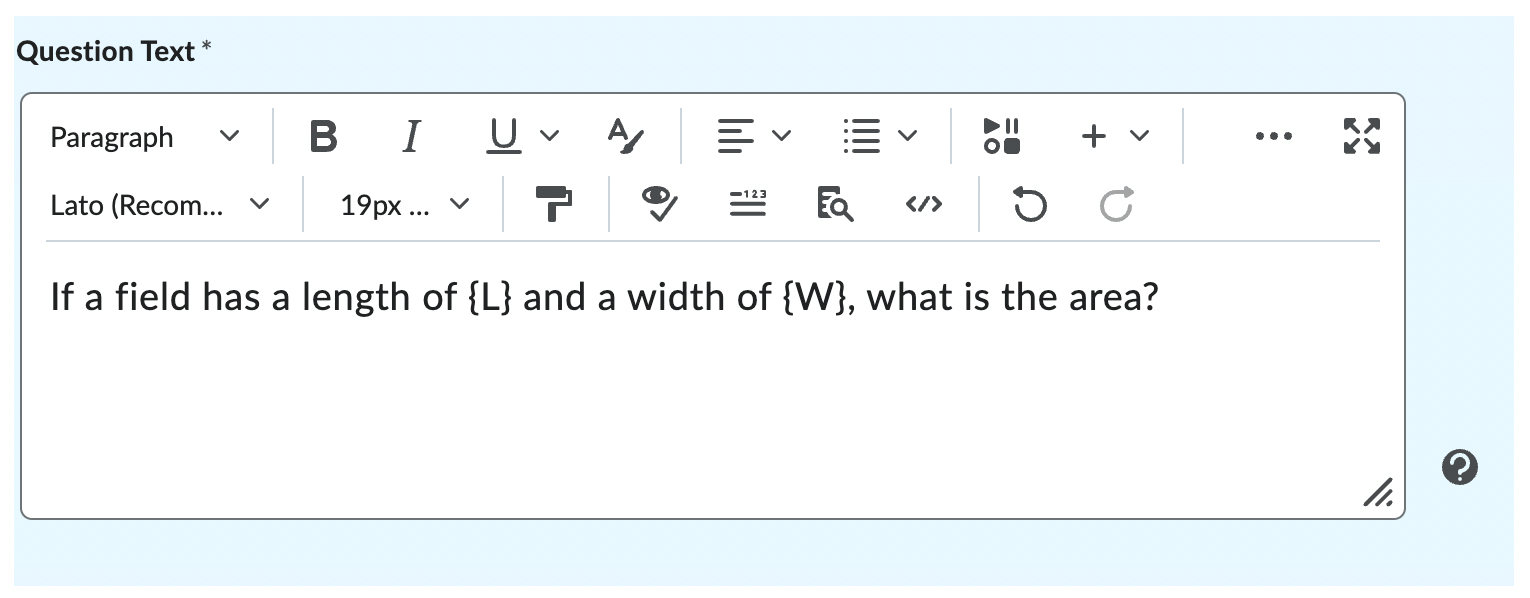
Enter the problem into the Question Text field. Enclose all variables with curly braces { } if you want to generate random numbers.
Note
The Graphical Equation editor can be especially helpful if the question contains a complicated formula. If you are working on a device with a small screen, you may have to click the ellipses for the Graphical Equation menu to appear.
Step 8
If this question has an image, click the Insert Image button to upload it from your computer. Use the Alternative Text field to provide information about the image.
Step 9
Check Allow attachments to support answers if you want students to upload images, documents, spreadsheets, and other files showing their work.
Step 10
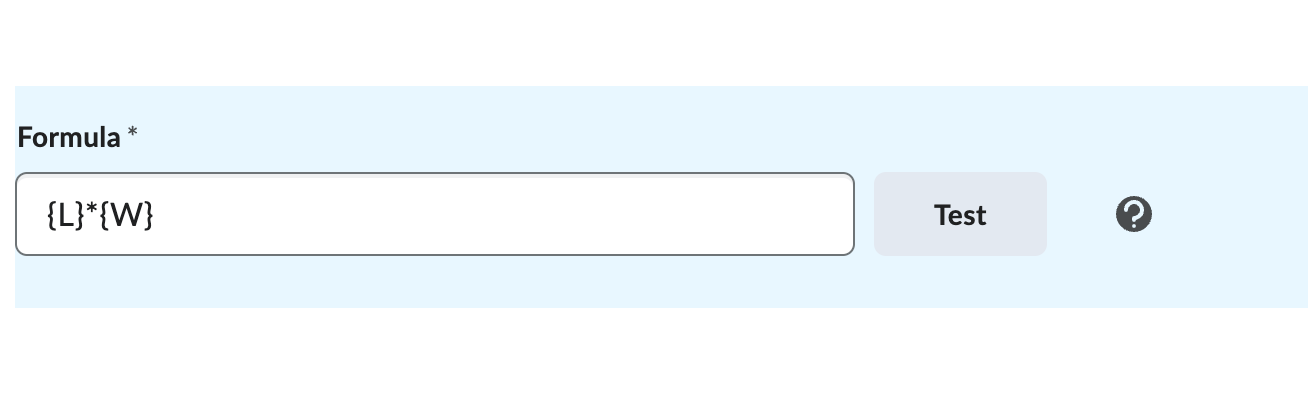
Enter the solution's formula in the Formula field, setting variables inside curly braces.
Step 11
Use the Answer Precision field to define the number of decimal places the answer may contain; check Enforce Precision if you want to require this number of decimal places in the correct answer.
Note
If you enforce precision, we suggest specifying the number of decimal places a correct answer should contain in your question or in the quiz instructions.
Step 12
To accept near-accurate, estimated, and/or rounded answers, enter a Tolerance level:
- Units allow you to specify how far numerically an answer can deviate and still be considered correct (e.g., setting a tolerance of .5 units on a correct answer of 100 will instruct D2L to accept any answer between 99.5-100.5).
- Percent allows you to use a percentage to determine how far off an answer can be (e.g., setting a tolerance of 1 on a correct answer of 50 will instruct D2L to accept any answer between 59.4-50.6).
Step 13
Use this option if the correct answer should include a unit of measurement (mm, cm, grams, inches, etc.):
- Enter the unit of measurement in the Units field.
- If you want to deduct points for incorrect units, use the Worth field to tell Brightspace what percentage of the question's points to assign to the unit.
Note
The student response must be an exact match to the units you enter unless you select the Regular Expression option and use Regular Expressions in the Units field. For an introduction to Regular Expressions, watch this Brightspace video (opens in new tab).
Step 14
If case matters, select Case Sensitive under Evaluation Options.
Step 15
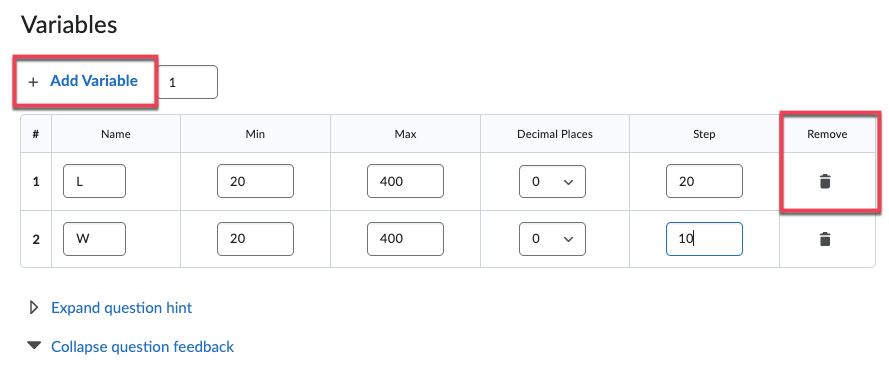
Add or remove Variables, as needed, to match the number of variables in the formula.
- Add a variable by clicking the Add Variable link.
- Remove a variable by clicking the Remove Entry (trashcan) icon.
Step 16
Assign values to your variables using the following fields:
- Name: The name should exactly match the corresponding variable in your formula.
- Min/Max: Assign a range from which Brightspace can randomly assign a value to that variable. If you do not want Brightspace to randomly assign a value, set the same number in both the Min and Max fields.
- Decimal Places: Use this field if you want to specify a number of decimal places for the variable.
- Step: This field instructs Brightspace to use intervals when drawing random numbers (e.g., if you set Min at 10 and Max at 100 and a Step of 5, D2L will randomly pull a number between 10-100 using intervals of 5).
Step 17
Click the Preview button to see how the question will look to students.
Step 18
Click the Save button to save your question, or Save and Close to save and return to the Question Library.
Create Significant Figure Questions
These questions include formulas that use significant figures. It is possible to deduct points when a student uses the incorrect number of significant figures in an answer.
Note
The difference between the "significant figure" and the “arithmetic” formats is that the former enables the reduction of the student’s grade if they do not provide an answer with the correct number of significant figures.
Step 1
Select Quizzes from the course navbar.
Step 2
Click on the Question Library tab.
Note
You can also use the Create New button within an individual quiz, but our recommended workflow is to create questions in the Question Library so you can use them for multiple courses.
Step 3
Click on the name of any Section folder to open it.
Step 4
Click the New button.
Step 5
Select Significant Figures (x10) from the menu.
Step 6
Enter the number of Points this question will be worth.
Step 7
Enter the problem into the Question Text field. Enclose all variables with curly braces { } if you want to generate random numbers.
Note
The Graphical Equation editor can be especially helpful if the question contains a complicated formula. If you are working on a device with a small screen, you may have to click the ellipses for the Graphical Equation menu to appear.
Step 8
If this question has an image, click the Insert Image button to upload it from your computer. Use the Alternative Text field to provide information about the image.
Step 9
Check Allow attachments to support answers if you want students to upload images, documents, spreadsheets, and other files showing their work.
Step 10
Enter the solution's formula in the Formula field, setting variables inside curly braces.
Step 11
Use the Significant Figures dropdown menu to define the number of significant figures the correct answer should contain.
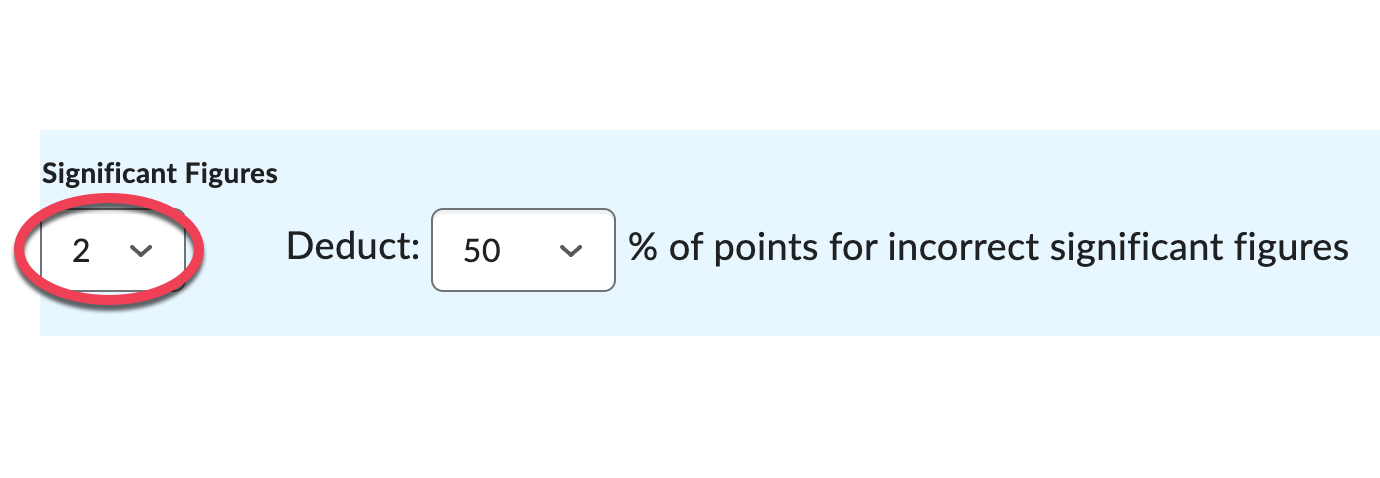
Note
If you require a specific number of significant figures in the answer, we suggest explaining that in your question or in the quiz instructions.
Step 13
To accept near-accurate, estimated, and/or rounded answers, enter a Tolerance level:
- The default is to allow an answer that is + or - 0.5 from the least significant figure.
- Units allow you to specify how far numerically an answer can deviate and still be considered correct.
- Percent allows you to use a percentage to determine how far off an answer can be.
Step 14
Use this option if the correct answer should include a unit of measurement (mm, cm, grams, inches, etc.):
- Enter the unit of measurement in the Units field.
- If you want to deduct points for incorrect units, use the Worth field to tell Brightspace what percentage of the question's points to assign to the unit.
Step 15
If case matters, select Case Sensitive under Evaluation Options.
Note
The student response must be an exact match to the units you enter unless you select the Regular Expression option and use Regular Expressions in the Units field.
Step 16
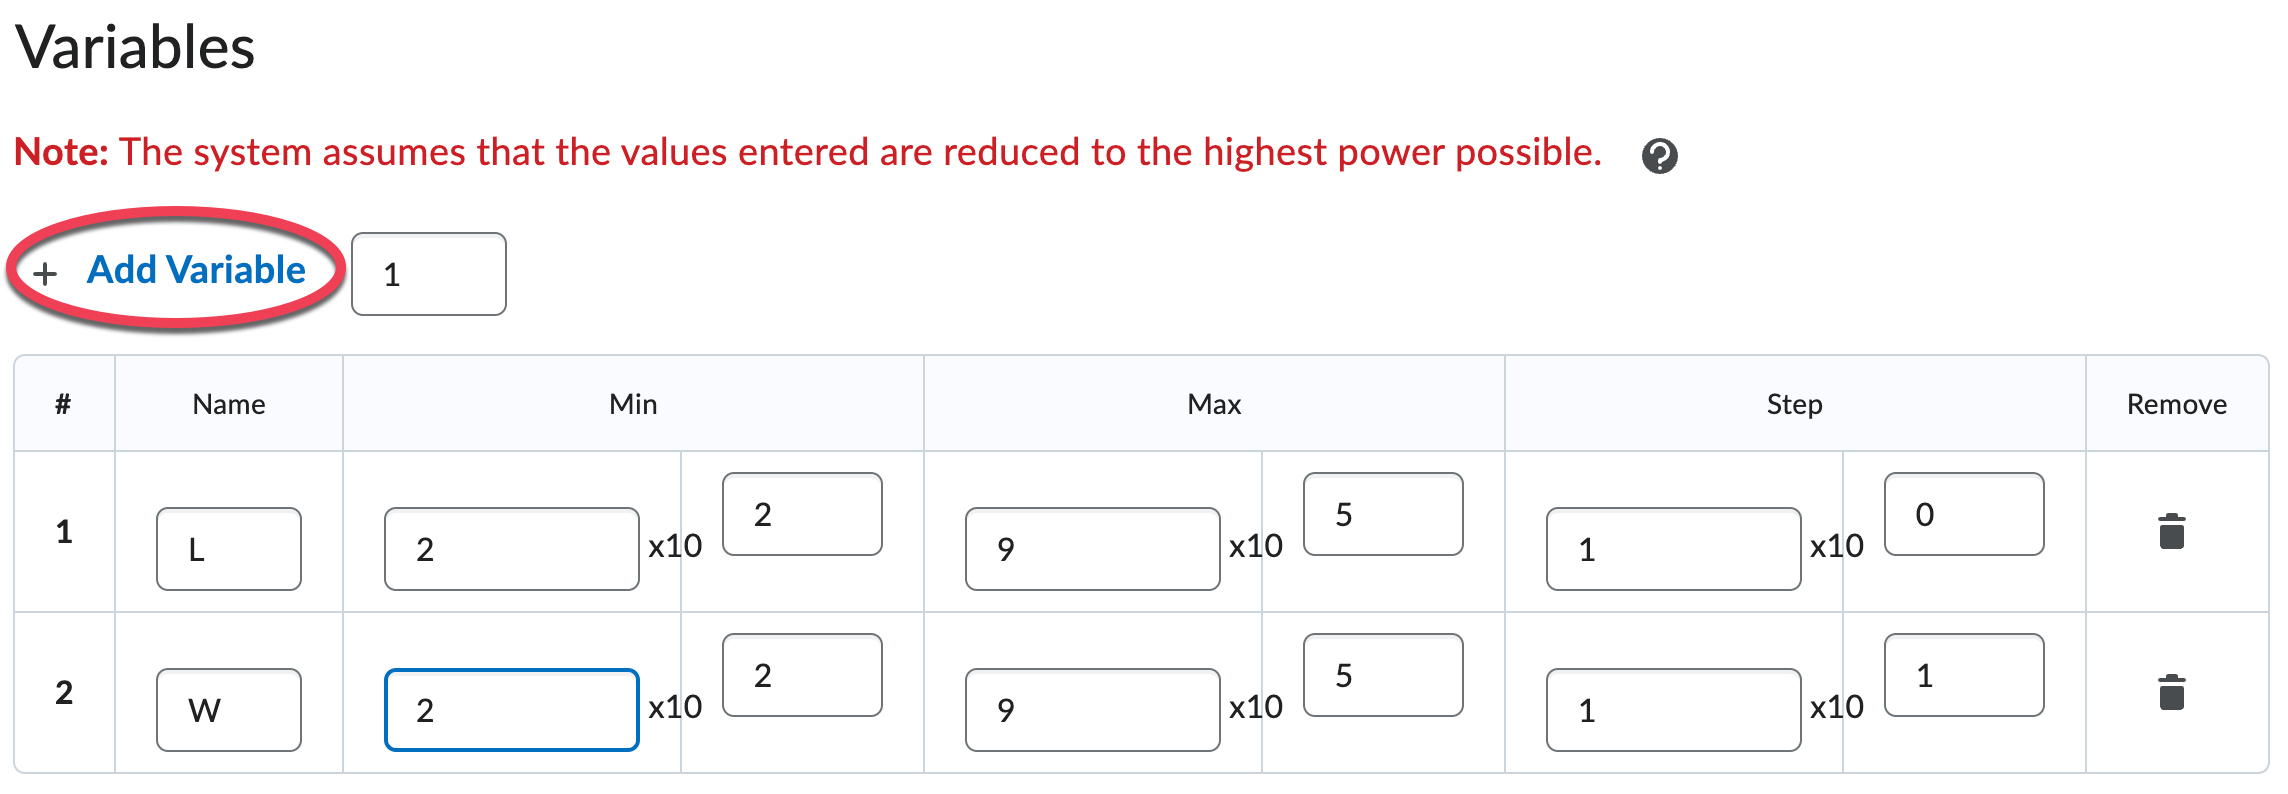
Add or remove Variables, as needed, to match the number of variables in the formula.
- Add a variable by clicking the Add Variable link.
- Remove a variable by clicking the trashcan icon.
Step 17
Assign values to your variables using the following fields:
- Name: The name should exactly match the corresponding variable in your formula.
- Min/Max: Assign a range from which Brightspace can randomly assign a value to that variable. If you do not want Brightspace to randomly assign a value, then set the same number in both the Min and Max fields.
- Step: This field instructs Brightspace at which intervals it should generate the coefficient and power.
Step 18
Click the Preview button to see how the question will look to students.
Step 19
Click the Save button to save your question, or Save and Close to save and return to the Question Library.