
Configure a Quiz
On This Page:
Create a Quiz and Link to a New Grade Item
Create a Quiz and Link to an Existing Grade Item
Add Start, Due and/or End Dates to Quiz
Set Number of Questions per Page
Create a Quiz and Link to a New Grade Item
Step 1
Select Quizzes from the course navbar.
Step 2
Select the New Quiz button.
Step 3
Enter a Name for your quiz.
Step 4a
Note
By default, a quiz is not associated with the grade book. Create an association so scores will transfer from a quiz to a Grade Item. Choose 4a if you don't have a category for the item in your grade book. Choose 4b to place the new item in the correct existing category in your grade book.
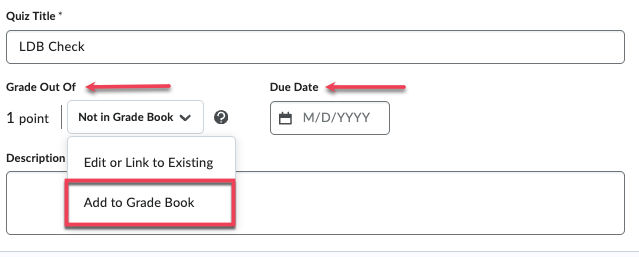
(Optional) If you want Brightspace to create an associated grade item in Grades automatically, select Not In Grade Book to expand the menu, then choose Add to Grade Book.
Step 4b
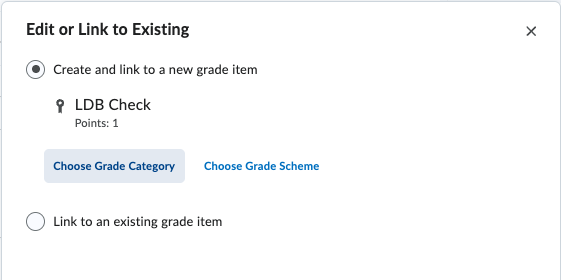
(Optional) If you want the new grade item to be placed in an existing grade book category, select Not in Grade Book to expand the menu. Choose Edit or Link to Existing because you will be editing the category for the item. Open the link to Choose Grade Category, then select the desired category from the menu. You can also select an alternative Grade Scheme here if desired.
Step 5
Enter a points value in the Grade Out Of field (see image in Step 4a) that opens once you connect the quiz to the grade book.
Step 6
(Optional) Add a Due Date (see image in Step 4a) to put this quiz in the Course Calendar. Students can submit the quiz after the due date but it will be marked as late.
Step 7
(Optional) Add a Description (See image in Step 4A). Students will be able to view the description before beginning the quiz.
Step 8
(Optional) At the bottom of the screen, select the Hidden toggle to change to Visible (so the quiz is visible to students). Select the Save button to remain in the quiz (or Save and Close to save your changes and exit).

Note
Making a quiz "Visible" means students can see the quiz listed in the Quizzes tool or in Content if linked in a module. If you have set a Start Date, students will see that date listed under the quiz title — they will not be able to start the quiz just because it is visible.
It is important to change the quiz to Visible manually — a quiz does not become visible automatically upon the Start Date.
Create a Quiz and Link to an Existing Grade Item
To link the quiz to an existing grade item or change the grade item currently associated:
Step 1
Select Quizzes from the course navbar.
Step 2
Select the New Quiz button.
Step 3
Enter a Name for your quiz.
Step 4
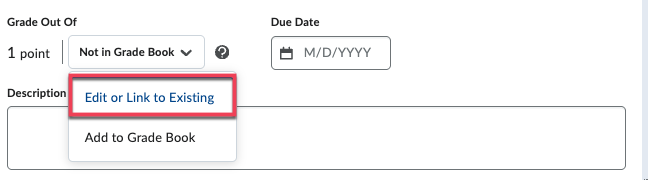
(Optional) If grading, select Not In Grade Book to expand the menu. Choose Edit or Link to Existing.
Step 5
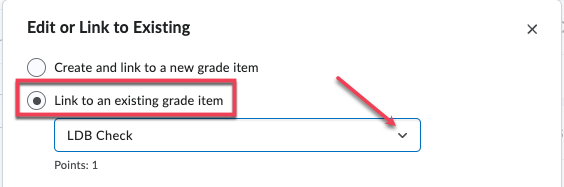
Choose the option to Link to an existing grade item. Choose the appropriate grade item from the dropdown menu and select OK.
Step 6
(Optional) Add a Due Date (see image in Step 4) to put this assignment in the Course Calendar. Students can submit the quiz after the due date but will be marked as late.
Step 7
(Optional) Add a Description (see image in Step 4). Students will be able to view the description before beginning the quiz.
Step 8
(Optional) At the bottom of the screen, select the Hidden toggle to change to Visible (so the quiz is visible to students). Select the Save button to remain in the quiz (or Save and Close to save your changes and exit).
Add Start and/or End Dates to Quiz
Note
When you add Start and End Dates, students can see the quiz name (as long as it is set to Visible) but cannot open it (nor can they see questions) outside that date range. When you add a Due Date, it serves as a reference only; students can still take the quiz after the due date. To set a Due Date, see either of the above articles. Set both to give students some leeway with a termination.
To restrict access to the quiz using start and/or end dates:
Step 1
On the Quiz Edit page, select the Availability Dates & Conditions section.
Step 2
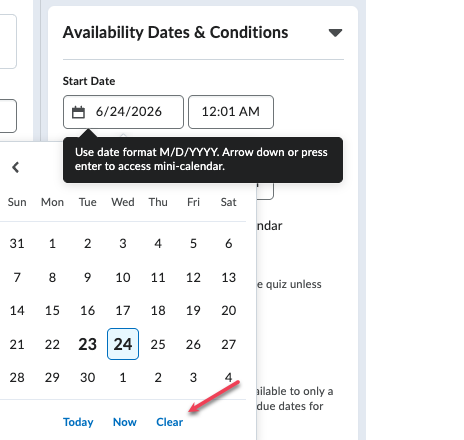
Select the Start Date and/or End Date fields to open a calendar and select a date and time. Students will see the basic quiz information (as long as it is set to Visible) but will not be able to take the quiz or see questions until after the Start Date.
Note
To remove the Start or End Date, select Clear at the bottom of the calendar pop-up window.
Step 3
Select the checkbox for Add availability dates to Calendar to add both Start and End Date events to the course calendar.
Step 4
Select the Save button to continue editing the quiz (or Save and Close to save your changes and exit the quiz).
Note
See the Exam Administration page at the Disability Resource Center website for details on planning date, location and time accommodations for your students.
Set Quiz Time Limits
Note
A student can exit and return to the quiz as many times as they want until the clock runs out (up to the quiz End Date if set).
Step 1
On the Quiz Edit page, select the Timing & Display section.
Step 2
Select Set time limit. Enter a number of minutes in the Time Limit field.
Step 3
Select Timer Settings.
Step 4
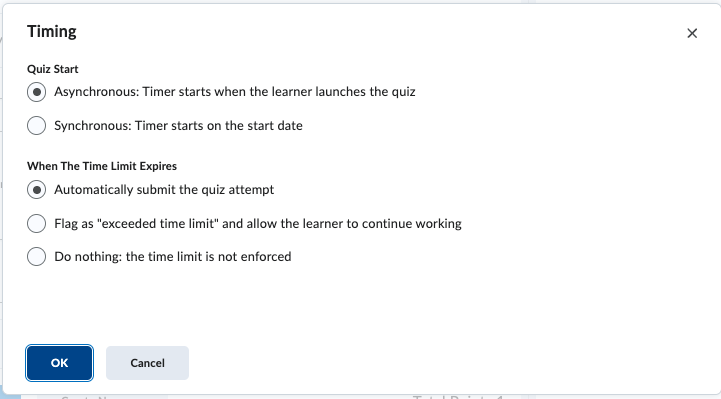
In the Quiz Start settings, select the radio button to indicate how you want the timer to start.
- Asynchronous: The quiz starts when the learner chooses to begin the quiz. Start, End, and Due Dates apply.
- Synchronous: The quiz timer starts on the Start Date for all learners. The quiz timer then ends for all learners at the same time. The Due Date is omitted if this option is selected.
Note
Reference Set Synchronous Quizzes in the next section for more information.
Step 5
In the When The Time Limit Expires settings (see above), select the radio button to indicate quiz behavior after the time limit expires.
Step 6
Select the Save button to continue editing the quiz (or Save and Close to save your changes and exit the quiz).
Set Synchronous Quizzes
What is a synchronous quiz?
Synchronous quizzes enable instructors to set up a quiz where the quiz timer starts on the Start Date for all learners rather than when the learner launches the quiz (asynchronous). The quiz timer then ends for all learners at the same time. This facilitates quizzes where the instructor requires all learners to take the quiz at the same time, similar to in-classroom exams.
Important things to know
- If you select the Synchronous Quizzes option before selecting a Start Date, Brightspace will warn you that there is no Start Date set.
- The Due Date is disabled for synchronous quizzes.
- The End Date is not required for synchronous quizzes (since the quiz closes once the time limit expires).
- If the Start Date and the End Date are set, Start and End Date events are created in the Calendar.
- If a synchronous quiz has an End Date set to close the availability window before the end of the timer, students will not be able to return to the quiz if they leave it (e.g. they lose their connectivity).
FAQs
-
Can I give special access to the quiz?
Yes. Be aware that the synchronous option applies to the special access as well. That is, students who are given special access to the quiz need to start it at the exact time the special access starts.
-
How do students know it is a synchronous quiz?
Brightspace shows when the timer starts in the same location as the Start Date.
-
Do accommodations set up in Classlist apply to synchronous quizzes?
Yes.
Set Number of Questions per Page
The Timing & Display section also provides options for displaying question on a page.
Step 1
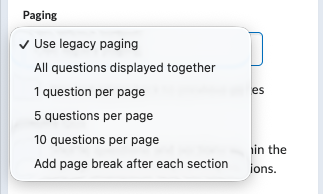
Open the Paging menu. If the quiz was created at a time when Brightspace paging was more flexible, you will see the option to use legacy paging. Otherwise, you need to choose one of the other following options:
Step 2
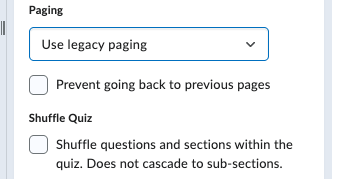
(Optional) You can prevent learners from going back to previous pages, and you can shuffle questions and sections within the quiz. If you want to shuffle within subsections, you will need to select it for each one.
Set Number and Conditions of Attempts
Step 1
Select the Attempts & Completion section.
Step 2
Select Manage Attempts.
Step 3
For Attempts Allowed, select the number of times students can take the quiz.
Step 4
(Optional) If students can take more than one attempt, choose an option for Overall Grade Calculation from the dropdown menu: the Highest, Lowest, Attempt Average, First or Last Attempt.
Step 5
(Optional) If you set more than one attempt, you will be presented the option to select On new attempts, only allow answers for previously incorrect questions.
Note
With this option, the quiz must be graded before students can take a second attempt. If the quiz is set to Auto-publish attempt results immediately upon completion, students will automatically receive the ability to start a new attempt. If this option is not selected and you have any manually graded questions, these must be graded and published first.
Step 6
(Optional) If you set more than one attempt, you will be presented with the option to select Attempt Conditions. You can enter percentage scores in the Min and Max fields under Attempt Conditions. This enables you to control which scores will qualify for a new attempt. Select OK.
Step 7
Select the Save button to continue editing the quiz (or Save and Close to save your changes and exit the quiz).
Set Auto-Publish and Grade Book Synchronization Actions
Step 1
Select the Evaluation & Feedback section.
Step 2
To allow Brightspace to automatically calculate each student's quiz grade for you and publish in the Quizzes tool, select Auto-publish attempt results immediately upon completion.
Note
Select this option only when your quiz contains questions that can be auto-graded, not for Written Response questions. Brightspace will give students a zero for ungraded questions, making their quiz scores appear lower than they actually are.
Step 3
If a grade item is associated with the quiz, you will have the option to select Synchronize to grade book on publish. This will automatically send quiz grades to the grade book when published, whether they are published manually or automatically.
Step 4
Select the Save button to continue editing the quiz (or Save and Close to save your changes and exit the quiz).