
Modify a Quiz
On This Page:
Edit a Quiz
Important
Changes, particularly those to questions and scoring, should not be made to a quiz that is currently available to students. Once students begin a quiz, their attempt behaves like an on-paper exam — any changes made to the Quiz do not apply to their attempt. Changes only apply to attempts that have not been started.
Step 1
Select Quizzes in the course navbar.
Step 2
Select the quiz name.
Step 3
Make your changes.
Step 4
Select the Save button to remain in the quiz (or Save and Close to save your changes and exit the quiz).
Edit Multiple Quizzes at Once
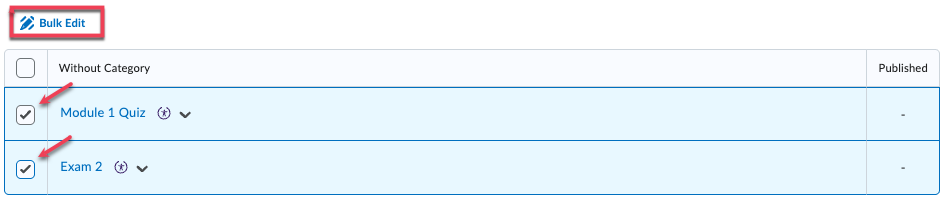
Use the Bulk Edit tool to edit multiple quizzes at the same time.
Step 1a
Select the checkbox next to each quiz you want to edit.
Step 1b
Select the Bulk Edit icon.
Step 2
In the window that appears:

You can do the following:
- Change a quiz Name
- Move a quiz into a new Category
- Add a new Category
- Hide the quiz from students
- Change the number of attempts allowed per student via the Attempts Allowed drop down menu
Step 3
When finished, select the Save button to save your changes and return to the quiz list.
Make Multiple Quizzes Visible
Step 1
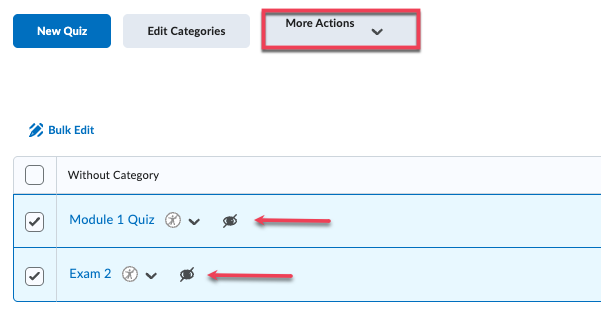
Select the checkboxes next to the hidden quizzes (look for the closed-eye icon).
Step 2
From the More Actions button, select Make Visible to Users.
Display Quizzes by Category or by Availability
Step 1
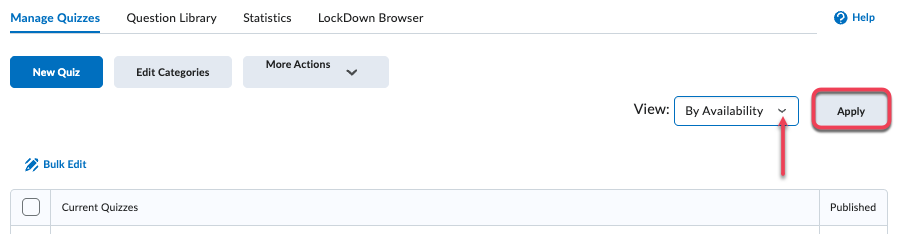
On the Manage Quizzes page, select the View using the toggle to choose By Availability or By Category, then Apply.
Note
If you view by Availability, they are grouped into Current, Future, and Past Quizzes based on date restrictions.
If you view by Category, they are arranged by categories that you set in place (see next section - Create Quiz Categories).
Create Quiz Categories
Note
Any categories you create are viewable by both you and your students.
Step 1
Select Quizzes from your course navbar.
Step 2
Select the Edit Categories button.
Step 3
Select the Add Category button.
Step 4
Give your category a name by entering text in the Name field.
Step 5
Use the Sort Order menus to put your categories in your desired order.
Step 6
Select the Save and Close button.
Reorder Your Quizzes
Brightspace lists quizzes in the order that you create them. You can change that order at any time.
Note
Students will view the same order as you do.
Step 1
Select the More Actions button and select Reorder.
Step 2
Use the dropdown menus in the Sort Order column to reorder your quizzes. Assign a 1 to the quiz you want first, a 2 to the quiz you want second, and so forth.

Step 3
When finished, select the Save button to save your changes and return to the quiz list.
Delete a Quiz
Important
Deleting a quiz also deletes any student attempts (students' completed quizzes) on that quiz. Confirm that you've selected to correct quiz to delete before using the steps below.
Note
If you created questions in the Question Library and imported them into your quiz, you can delete the quiz without losing the questions. If you created questions within the quiz, import them into the Question Library for safe-keeping.
Step 1
Select the checkbox next to the quiz or quizzes that you would like to delete.
Step 2
Select the More Actions button and Delete.
Copy a Quiz
Step 1
Select Quizzes in the course navbar.
Step 2
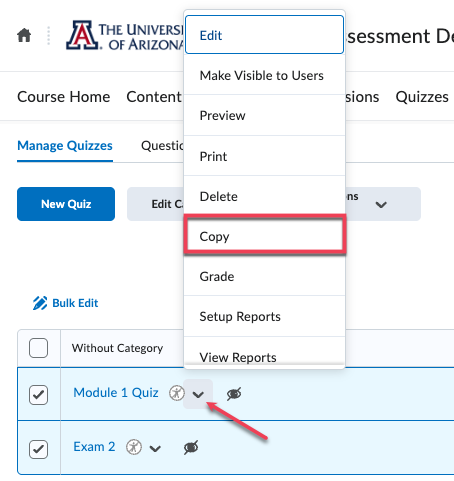
Select the Actions Menu icon for the quiz you want to copy and choose Copy.
Step 3
Brightspace will automatically open the Edit Quiz page, allowing you to make any changes to the copied quiz. Select the Save and Close button when you are finished.
Print a Quiz
Print your quizzes for offline use.
Note
The Print Quiz functionality supports all native Brightspace question types, as well as Question Pools, Shuffling questions and sections, and Randomizing answer order. See our Quiz Question Options help page for guidance if needed.
Step 1
From the Manage Quizzes page, select Print from the Action Menu icon to the right of the quiz you wish to print.

Step 2
On the Print Quiz page, select your choice of the following settings:
- Number of Versions needed (this will appear under Randomization and only if you are using randomized options such as Question Pools in your quiz)
- Name field (optional)
- Student ID field (optional)
- Date field (optional)
- Select Answer Key: Show correct answers if you want to print the quiz with the answers.

Step 3
If you have multiple versions to account for randomized options, select a version tab. If you are printing an Answer Key, make sure it is the version you need. You can select the link for a new version as many times as needed.

Step 4
Print your selected version via the Print button.
Preview a Quiz
Step 1
Select the Action Menu icon next to the name of the quiz.
Step 2
Select Preview from the menu.
Step 3
Select the Start Quiz! Button, then select Preview.
Step 4
From within the quiz Preview page, you can view the page layout (e.g., the number of questions per page), answer all questions, and move through each page of the quiz.
Step 5
When finished, select the Submit Quiz button.
Step 6
Check Allow this preview attempt to be graded in the Grade Quiz area if you want to check how your quiz attempt will be auto-graded by Brightspace. Select the Submit Quiz button a second time.
Step 7
When you are finished, select the Exit Preview button (top right corner) on any quiz preview screen.